Code P0030 indicates a malfunction in the oxygen sensor heater circuit (O2 sensor) before the catalytic converter – Bank 1 Sensor 1. This affects fuel mixture accuracy and emissions. Below is a brief summary and step-by-step solutions.
| DTC code | Official description | Component/system | Location | Severity | Symptoms (brief) | Top causes | Quick fix |
|---|---|---|---|---|---|---|---|
| P0030 | HO2S heater control circuit (Bank 1 Sensor 1) | Exhaust system | Before catalytic converter, Bank 1 Sensor 1 | High (MIL illuminates after 2 drive cycles) | Check engine light, delayed sensor response for 3–5 min, power loss, and increased fuel consumption | Faulty sensor heater, wiring open circuit or short, blown fuse | Continuity check with multimeter from PCM/ECM to sensor, replace sensor if open circuit |
Page contents
What does code P0030 mean (DTC P0030)
Code P0030 indicates a fault in the oxygen sensor heater circuit (O2 sensor) before the catalytic converter – Bank 1 Sensor 1. The malfunction relates to the heater circuit: open circuit, short circuit, or incorrect resistance.
The engine control module (ECM/PCM) continuously monitors current and voltage in the heater circuit. The heater receives +12 V power when the ignition is on, while the PCM/ECM controls ground or the control signal. If current is absent (open circuit, blown fuse) or resistance is out of specification, the PCM/ECM sets the code and turns on the check engine light.
Conditions for setting code P0030:
- Engine running.
- Self-diagnostic system detected no current in the oxygen sensor heater circuit.
- Fault present for 2 drive cycles (sequence: ignition off – ignition on – engine running – driving – stop – ignition off).
- HO2S heater resistance below 3 ohms or above 35 ohms.
- Catalytic converter temperature above 572°F (300°C).
While the heater is not working, the sensor takes longer to reach operating temperature of 600–800°F (315–425°C). During this time, the ECM switches to a fixed fuel mixture mode—mixture corrections are delayed, engine performance worsens, and exhaust emissions increase during cold start.
Without the heater, the sensor may reach operating mode in 3–5 minutes instead of the usual few seconds. This noticeably affects engine behavior in the first minutes after startup.
Sources:
- Ross-Tech VCDS documentation recommends checking the O2 heater circuit per the repair manual and wiring diagram: https://wiki.ross-tech.com/wiki/index.php/P0030
- Scribd document describes a procedure for inspecting HO2S (B1/S1) heater resistance (ignition OFF, measurement between terminals): https://www.scribd.com/document/898921410/0030
How the oxygen sensor works and why it is important for the catalytic converter
The oxygen sensor (O2 sensor) measures residual oxygen in exhaust gases and sends a signal to the PCM/ECM. Based on this signal, the controller adjusts the air-fuel mixture to a stoichiometric ratio (around λ=1), improving combustion efficiency.
The built-in heater accelerates the oxygen sensor’s warm-up to operating temperature. The heating element, made of platinum or a special alloy, maintains temperatures of 572–1112°F (300–600°C). Heating up to operating temperature within seconds allows the PCM/ECM to quickly enter closed-loop control—starting precise fuel corrections based on sensor signal (100–900 mV for zirconia sensors, 2.3–5 V for wideband A/F sensors).
Rapid sensor activation enables the catalytic converter to reach optimal efficiency sooner. The catalyst achieves maximum efficiency only with an accurate air-fuel mixture. If the sensor is not heated, the PCM/ECM uses fixed mixture parameters—resulting in increased CO and HC emissions during cold engine operation and reduced fuel economy.
Precise fuel corrections begin only after the sensor warms to 572–932°F (300–500°C). With a working heater, this typically takes seconds; without it, 3–5 minutes.
Main symptoms and signs of P0030 malfunction
If the heater circuit is faulty, symptoms affecting vehicle behavior and emissions can appear. The sensor cannot quickly reach operating temperature, and the PCM/ECM switches to fixed mixture mode.
Main signs:
- Check engine light on—MIL illuminates after two drive cycles upon detecting a heater circuit fault.
- Increased fuel consumption—especially noticeable during cold start when the PCM/ECM enriches the mixture without sensor feedback.
- Unstable idle—fluctuating RPM in the first minutes after startup.
- Power loss and hesitation during acceleration—the engine may feel sluggish until the sensor fully warms up, causing reduced throttle response.
- Extended warm-up to stable operation—the engine takes longer to reach normal running conditions, with drivability issues during the first 3–5 minutes.
- Possible failure during emissions testing—cold-cycle emissions may exceed limits due to an enriched mixture without correction.
Additionally, this code often appears alongside other codes: P0032 (high voltage in heater circuit), P0031 (low voltage), P0135 (heater performance), P0134 (sensor inactive), P2195/P2196 (rich/lean mixture).
All possible causes of code P0030
Causes of code P0030 relate to heater circuit faults. The heating element in the oxygen sensor may fail, or the issue may lie in the wiring from the PCM/ECM to the sensor. Diagnostics check the entire circuit from fuse to sensor connector.
Main causes:
- Burned-out heating element in oxygen sensor (B1S1)—internal break or high resistance in heating coil.
- Wiring open circuit—chafed wire, conductor with increased resistance, break in harness near the hot exhaust manifold.
- Short to ground or power—damaged insulation contacting chassis or another wire.
- Connector damage, corrosion—oxidized or loose connector pins, water intrusion in sensor connector.
- Blown fuse or faulty relay—heater circuit fuse blown due to overload or short circuit.
- Incorrect wiring—improper harness repair or modification.
- PCM/ECM malfunction—heater driver failure in the control module (rare, may require software update or module replacement).
- Poor engine/chassis ground—high resistance in grounding circuit affecting heater operation.
In many cases, P0030 is resolved by replacing the HO2S Bank 1 Sensor 1; in other cases, wiring repair or fuse replacement is needed.
Step-by-step diagnosis of P0030: how to check voltage and resistance of the oxygen sensor
Disclaimer: Information is general and does not replace professional consultation. Perform vehicle work following safety precautions.
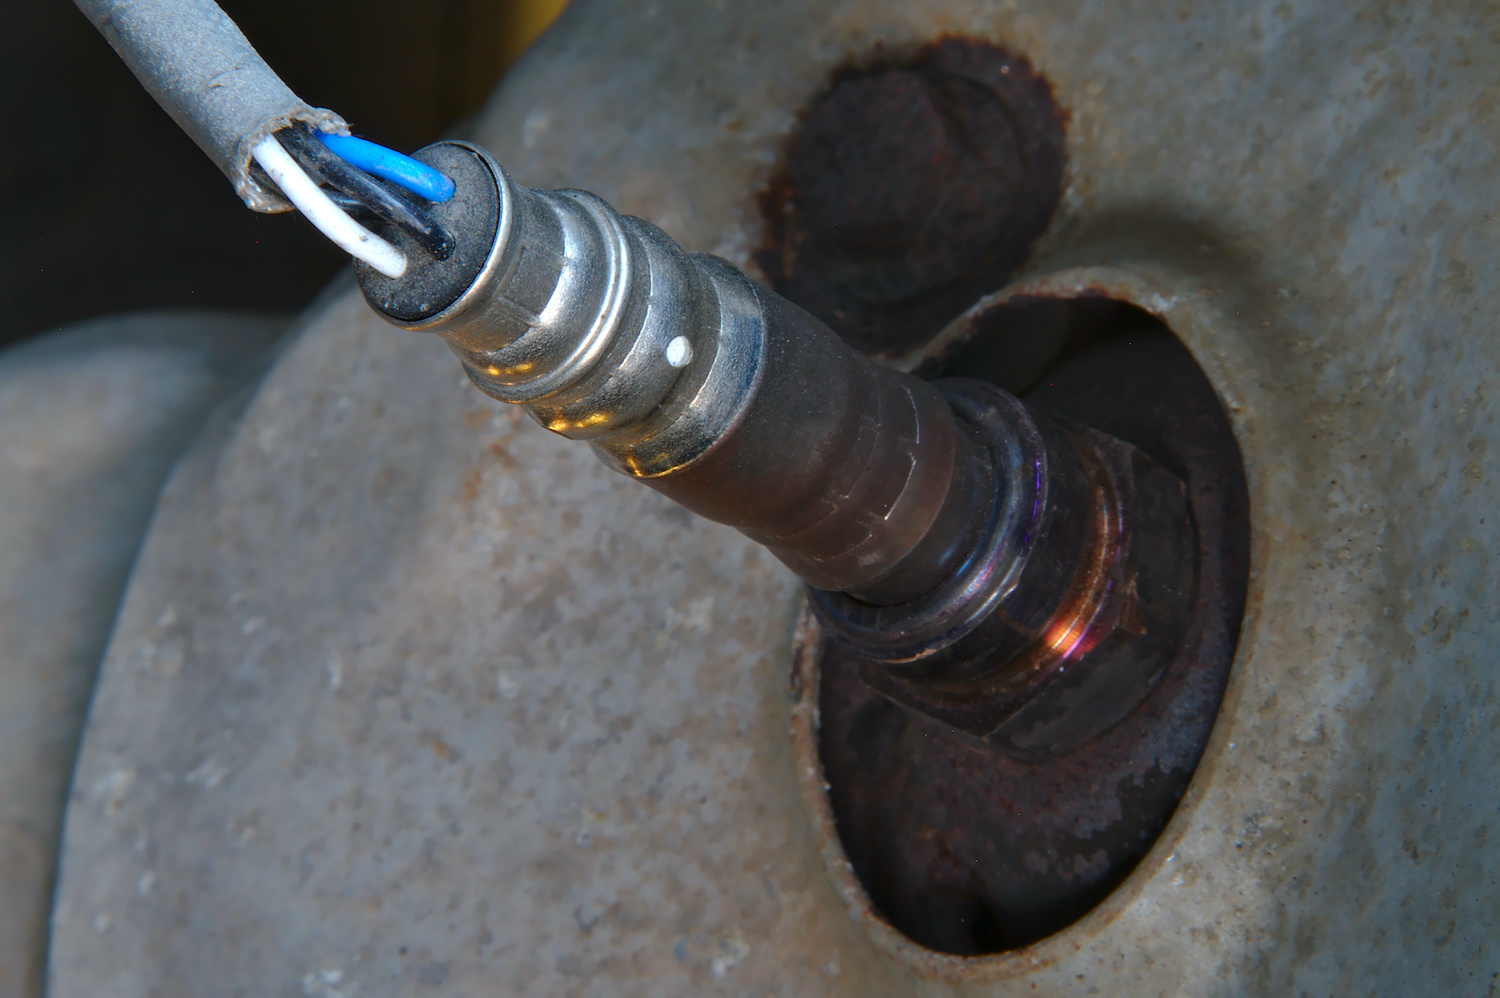
Start diagnosis with a visual inspection. Check the wiring harness and connector of Bank 1 Sensor 1 for melting, chafing, or corrosion.
Step 1: Clear code and test drive
Connect an OBD-II scanner, confirm code P0030, clear it, and perform a test drive. If the code returns after engine warm-up, proceed to electrical checks.
Step 2: Check supply voltage
Disconnect the Bank 1 Sensor 1 connector. Turn the ignition on (do not start the engine). Measure voltage at the power pin of the harness connector (not the sensor side) with a multimeter set to volts DC. It should typically be about 12–14 volts. If no voltage is present, check the fuse and power circuit from the fuse box.
Pinout of a typical 4-wire HO2S connector:
- Top right: +12 V (heater power)
- Bottom left: ≤3.27 V (heater control from PCM/ECM)
- Top left: ≈0.02 V (signal ground)
- Bottom right: ≈0.45 V (oxygen sensor signal)
Note: pinout may vary by make and model; consult the service manual.
Step 3: Check heater resistance
Disconnect the sensor connector. Measure resistance between the two heater terminals on the sensor itself (usually two wires of the same color, e.g., white) using an ohmmeter.
Typical values:
- Zirconia sensors (standard): 3–30 ohms (commonly 7–20 ohms at 68°F [20°C]).
- Wideband A/F sensors (Toyota/Lexus): 1–5 ohms (often 2–5 ohms at 59–68°F [15–20°C]).
If resistance is infinite (OL), the heater is open circuit. If it is 0 ohms, there is a short circuit. Both conditions typically require sensor replacement.
Step 4: Check circuit continuity
Test the wiring from the fuse box to the sensor connector with a multimeter. Check both lines (power and ground/control). High resistance or an open circuit indicates harness damage.
Load testing (optional):
Use a 5–21 W test light instead of the sensor to test the power line—this can reveal intermittent connections that a voltmeter may miss under low current.
Check power under load: a 5–21 W test light can detect intermittent contacts unnoticed by a voltmeter.
How to fix P0030: from wiring repair to sensor replacement
To resolve the issue, follow priorities. Fix simple defects first, then proceed to component replacement.
Step 1: Check and replace fuse
Check the heater circuit fuse in the underhood fuse box according to the cover diagram. If blown, replace it, but identify the cause of the overload (short circuit in wiring). Simply replacing the fuse without fixing the short will cause repeated fuse failure.
Examples of fuse locations:
- VAG (Skoda Fabia): fuse HTR/IGN No. 31, 10 A (interior fuse box).
- Toyota/Lexus: HTR/IGN in underhood fuse box (check cover diagram).
- Ford: O2 HTR in BJB/BCM (check cover diagram).
- Hyundai/Kia: common fuse, check manual.
- VAZ: oxygen sensor fuse in main fuse box.
Important: always refer to the specific vehicle’s service information.
Step 2: Clean and repair connector
Clean sensor connector contacts to remove oxidation and corrosion. Tighten or repair connector terminals. If the connector is worn (loose pins, cracked housing), replace it with a new one.
Step 3: Restore wiring
If damaged wires are found, repair the harness or reroute it away from hot surfaces. Repair insulation with heat-shrink tubing and insulate solder joints. Wires near the exhaust manifold often overheat—relocate the harness or install heat shielding.
Step 4: Replace oxygen sensor
If the heater is open circuit (infinite resistance) or shows resistance outside specification, replace Bank 1 Sensor 1. Use a direct-fit sensor matching your vehicle’s specifications. Avoid cutting wiring unless necessary—universal sensors requiring splicing demand skill for reliable connections.
Apply anti-seize compound to the sensor threads, avoiding the sensing element. Tighten the sensor with a torque wrench per manufacturer specs (commonly 22–37 lb-ft [30–50 Nm]).
Step 5: Clear code and verify
After repair, clear the code with an OBD-II scanner. Perform a test drive (drive cycle)—warm up the engine and drive in mixed conditions for 15–20 minutes. Check whether the code returns.
Where is Bank 1 Sensor 1 located on different engines
Inline engines (I4, I6)
On inline engines (four- and six-cylinder), all cylinders are in a single row—this is Bank 1. Sensor 1 (B1S1) is the first sensor before the catalytic converter on the single exhaust manifold, closer to the engine.
V-type engines (V6, V8)
V engines have two cylinder banks. Bank 1 is the side with cylinder No. 1. To identify Bank 1, locate cylinder No. 1 according to your vehicle’s firing order. Usually, this is the front or passenger-side bank (viewed from the rear of the engine, opposite the belts).
Sensor 1 is the upstream sensor before the catalytic converter on that bank. The second sensor on the same bank (Sensor 2) is located downstream of the catalyst.
Bank 1 identification: regardless of transverse or longitudinal engine layout, Bank 1 always corresponds to cylinder No. 1.
Severity and is it drivable with P0030
Driving with code P0030 is possible but limited—the vehicle will usually not stall, but ignoring the issue can lead to cumulative consequences.
Short term: risk of increased fuel consumption and emissions until the sensor warms up. The PCM/ECM uses a fixed fuel mixture for the first 3–5 minutes after startup, reducing engine performance and fuel economy.
Long term: prolonged operation without repair can accelerate catalytic converter wear (an enriched mixture overloads the catalyst with unburned hydrocarbons), spark plug fouling, and failure during emissions testing. Delayed sensor response can contribute to poor engine operation.
Recommendation: fix the fault as soon as possible. Driving to a repair shop is acceptable; ignoring it for months is not recommended.
Common diagnostic mistakes and safety precautions
Disclaimer: Information is general and does not replace professional consultation. Perform vehicle work following safety precautions.
Common mistakes:
- Replacing the sensor without checking power and ground—the new sensor will not work if the wiring or fuse is faulty.
- Ignoring damaged wiring near the exhaust manifold—wires overheat and chafe; simply replacing the sensor will not solve the problem.
- Measuring resistance on a hot sensor—high temperature distorts readings; measure only on a cold sensor.
- Installing the sensor without a torque wrench—over-tightening can strip threads in the manifold; under-tightening can cause exhaust leaks.
- Working under the vehicle without jack stands, or on a hot exhaust—risk of burns and injury if the car falls off the jack.
Safety precautions:
- Work on a cooled exhaust (wait 30–60 minutes after engine shutdown).
- Use protective gloves and safety glasses.
- Support the vehicle with jack stands; do not rely solely on a jack.
- Avoid getting anti-seize compound on the sensor’s sensing element.
Parts selection and repair cost
How to choose an oxygen sensor: OEM vs aftermarket
OEM (original equipment manufacturer):
- Stable calibration, precise connectors, lifespan per manufacturer specs.
- Guaranteed PCM/ECM compatibility.
- Higher price but minimal risk of incompatibility.
Quality aftermarket (direct-fit):
- 20–40% cost savings compared to OEM.
- Brand reputation matters (Bosch, Denso, NGK, Delphi).
- Connector and thread match OEM exactly; installation requires no modifications.
Universal (requires soldering):
- Requires cutting the factory connector and splicing wires.
- Up to 50% savings but demands skill for quality connections (heat shrink, insulation).
- Risk of wiring errors and poor contact.
Estimated labor costs
- Electrical diagnostics: 0.5–1.0 labor hours.
- Sensor (B1S1): cost varies by vehicle make and sensor type (OEM/aftermarket).
- Replacement labor: 0.5–1.0 labor hours (depends on sensor accessibility and thread condition; rust increases time).
Tips:
- Use anti-seize compound on sensor threads (avoid the sensor element).
- Tighten the sensor to manufacturer torque specs (commonly 22–37 lb-ft [30–50 Nm]).
- When installing universal sensors, strictly follow wiring pinout; quality soldering and heat shrink are mandatory.
| Sensor type | Price range (approx.) | Pros/cons | When to choose |
|---|---|---|---|
| OEM | Premium segment | Accurate calibration, durability; downside – price | When durability is critical, vehicle under warranty |
| Direct-fit aftermarket | Mid segment | 20–40% savings, exact connectors; quality depends on brand | Balance of price and quality, trusted brand |
| Universal with soldering | Budget segment | Up to 50% savings; risk of errors, requires soldering skill | For skilled wiring work and limited budget |
Note: lh = labor hours.
Features of P0030 on popular vehicles
Toyota/Lexus
Often use wideband A/F sensors (air-fuel ratio sensors) instead of standard zirconia oxygen sensors. A/F sensors have low heater resistance (2–5 ohms at 59–68°F [15–20°C]) and may require operating temperatures up to 1200°F (650°C).
Technical parameters of A/F sensor (Toyota/Lexus):
- Voltage on white wire AF1: about 3.0 V (disconnected connector, KOEO).
- Voltage on blue wire AF2: about 3.3 V (disconnected connector, KOEO).
- Heater power: up to 75 W (current 5–7 A for the first 20 seconds, then duty cycle).
Note: values vary by model; consult OEM documentation.
Check IGN/HTR fuses per the diagram—often shared with other systems.
VAG (VW/Audi/Skoda/Seat)
Oxygen sensor heaters are often powered through a common fuse block. Pay attention to ground points on the chassis—poor ground contact affects heater operation. Check ground circuit resistance.
Ford
Ford PCMs are sensitive to high contact resistance in sensor connectors. Heater control is current-based—even slight contact oxidation can trigger P0030. Thoroughly clean and inspect connectors.
VAZ models
Wiring near the exhaust manifold is prone to overheating and melting. Often requires rerouting the harness away from hot surfaces or installing heat shields. Check wire insulation condition along the entire path from the PCM/ECM to the sensor.
| Make | B1S1 sensor type | Typical diagnostic notes | Heater resistance note |
|---|---|---|---|
| Toyota/Lexus | A/F sensor (wideband) | Voltage check 3.0 V (AF1), 3.3 V (AF2) at KOEO; current control 5–7 A | 2–5 ohms (at 59–68°F [15–20°C]) |
| VAG (VW/Audi/Skoda/Seat) | Standard zirconia | Common fuses; attention to ground points on chassis | 7–20 ohms |
| Ford | Standard zirconia | Current-based control; sensitive to connector resistance | 10–15 ohms (typical) |
| VAZ models | Standard zirconia | Wiring overheating near manifold; often requires rerouting/heat shields | 10–20 ohms |
Note: data collected from field cases and should be confirmed with OEM service information.
Related codes: how to distinguish and what to do
Code P0030 is a general fault in the HO2S Bank 1 Sensor 1 heater circuit. Related codes specify the type of electrical issue:
P0031: Heated oxygen sensor (HO2S) heater circuit low voltage Bank 1 Sensor 1
- Low voltage detected in heater circuit.
- Usually indicates an open circuit or high resistance (poor contact, damaged wire).
P0032: HO2S heater circuit high voltage Bank 1 Sensor 1
- High voltage detected in heater circuit.
- Indicates short to power or a heater driver stuck on in the PCM/ECM.
P0135: HO2S heater performance Bank 1 Sensor 1
- Heater performance fault.
- Heater operates but does not reach the expected operating range (slow warm-up, unstable current).
Associated fuel mixture codes (P2195/P2196):
- May appear when the sensor takes a long time to warm up— the PCM/ECM records rich or lean corrections before normal sensor operation begins.
What to do:
All four codes (P0030, P0031, P0032, P0135) relate to the heater circuit, not necessarily the oxygen sensor element itself. Diagnosis starts with checking power, ground, heater resistance, and wiring integrity. Only after confirming a circuit or sensor fault should replacement be done.
| Code | Symptom | Likely cause | Priority check |
|---|---|---|---|
| P0030 | General heater circuit fault | Open, short, faulty sensor | Power, heater resistance, wiring |
| P0031 | Low voltage in heater circuit | Open, high resistance, poor contact | Wiring integrity, connector, fuse |
| P0032 | High voltage in heater circuit | Short to power, PCM/ECM driver stuck | Wiring short, PCM/ECM |
| P0135 | Heater performance low | Slow warm-up, unstable current | Sensor heater, power under load |
Prevention and post-repair checks
After fixing P0030, perform follow-up checks to ensure the repair was successful.
Checklist:
- Clear codes with an OBD-II scanner—remove stored codes.
- Test drive and drive cycle—warm up the engine, then drive in mixed conditions for 15–20 minutes (city + highway).
- Check readiness monitors—ensure all monitoring systems (O2 sensor monitor, catalyst monitor) show “Ready” status. If not ready, perform a full drive cycle per manufacturer instructions.
- Monitor fuel trims (STFT/LTFT)—after full warm-up, check short-term and long-term fuel trims at idle and acceleration. A typical range is within ±10%, but exact values vary by vehicle. Larger deviations may indicate sensor circuit or mixture issues.
- Inspect harnesses/clips/heat protection near the manifold—ensure wires are securely fastened and protected from overheating.
- Recheck connectors for corrosion after 1–2 weeks—especially important in high humidity or winter conditions (road salt).
Technical parameters (for experts)
Heater power supply:
- Voltage: 12–14 V with ignition on (IGN ON).
- Control: ground/signal from PCM/ECM; some systems use PWM control (duty cycle after the first 20 seconds).
Heater resistance (typical values at 59–68°F [15–20°C]):
- Zirconia sensors (standard): 3–30 ohms (commonly 7–20 ohms).
- Wideband A/F sensors (Toyota/Lexus): 2–5 ohms (commonly 3–9 ohms).
- Note: values depend on manufacturer and model—always consult the service manual.
Load testing:
- Use a 5–21 W test light instead of the sensor to test the power line (detects intermittent contacts).
Typical connectors:
- 4 wires: 2 for heater (usually same color, e.g., white), 2 for signal (colors vary by manufacturer).
- Wiring color codes per OEM service information for the specific model.
| Parameter | Standard | Note |
|---|---|---|
| Heater power supply | 12–14 V (IGN ON) | Measure at harness connector with sensor disconnected |
| Heater resistance (zirconia) | 3–30 ohms (typically 7–20 ohms at 68°F [20°C]) | Measure on cold sensor between heater terminals |
| Heater resistance (A/F sensor) | 2–5 ohms (typically 3–9 ohms at 59–68°F [15–20°C]) | Toyota/Lexus; heater power up to 75 W |
| Load testing | 5–21 W test light | For power line testing and detecting poor contacts |
Note:
Content is for educational purposes only, does not replace professional inspection, and is not a repair manual. Perform vehicle work following safety precautions or consult a qualified technician.
Frequently asked questions
Is it possible to drive with code P0030?
In short — yes, but not for long. The vehicle remains drivable, but the PCM/ECM switches to a fixed fuel mixture during the first 3–5 minutes after startup. This leads to increased fuel consumption, unstable engine operation, and higher emissions. Ignoring the code for a long time can accelerate wear of the catalytic converter (overloaded with unburned hydrocarbons) and spark plugs (carbon deposits, fouling). Failure during emissions testing is possible. Recommendation: fix the fault as soon as possible to help avoid catalyst damage and increased fuel consumption.
How much does it cost to replace the sensor with code P0030?
The cost depends on the vehicle model, sensor type (OEM or aftermarket), and region. Approximate budget: diagnostics: 0.5–1.0 labor hours. Sensor (B1S1): price varies depending on the vehicle make and sensor type. Replacement labor: 0.5–1.0 labor hours (depends on sensor accessibility; rust and difficult access increase time). The total cost consists of the sensor price and labor charges. DIY replacement reduces expenses to the cost of the sensor and consumables (anti-seize compound).
Will cleaning the oxygen sensor help with code P0030?
No. Code P0030 indicates a heater circuit malfunction in the sensor, not contamination of the sensing element. Cleaning (chemical or mechanical) will not restore a broken or shorted heater element, nor fix wiring opens or shorts. If diagnostics reveal a heater open circuit (infinite resistance) or short circuit (0 ohms), sensor replacement or electrical circuit repair is required. Sensor cleaning may help only for codes related to slow response or sensor contamination (e.g., P0133), but not for P0030.