The information provided is general and does not replace professional consultation.
Code P0137 is one of the most common OBD-II codes indicating low voltage in the rear oxygen sensor circuit (post-catalyst). Below, we will explain what this code means, why it appears, and how to diagnose and fix it yourself.
Page contents
Quick answer and what to do right now
If the Check Engine light comes on and the scanner shows P0137, follow this plan:
Safety first: turn off the engine and allow the exhaust system to cool down. Do not touch hot components—the rear oxygen sensor is located after the catalytic converter in a high-temperature area.
Read the codes: connect an OBD-II scanner, record P0137, and check for related codes (P0138, P0139, P0140, P0141). Save freeze-frame data—it will show the conditions under which the PCM detected the fault (coolant temperature, RPM, load, speed).
Visual inspection: examine the wiring and connector of Bank 1 Sensor 2 (rear sensor on the first cylinder bank side). Look for signs of melting, insulation wear, or corrosion on contacts. Connector corrosion is a common cause of false readings, especially in regions that use road salt.
Check the exhaust system: inspect the section before sensor 2 for leaks. Burned gaskets or cracks often cause low voltage because incoming oxygen dilutes the exhaust gas at the measurement point.
Live data: start the engine and open live data on the scanner. If Bank 1 Sensor 2 voltage consistently stays below 0.1–0.2 V, look for leaks, a lean mixture, or a faulty sensor. For comparison, the front sensor (B1S1) should actively fluctuate between rich and lean conditions.
Make a decision: fix the identified cause (leak, wiring, or sensor replacement), clear the code, and drive in mixed conditions so the PCM completes the readiness monitor cycle. If the Check Engine light does not return, the issue is resolved.
Error P0137: what the code means and why the Check Engine light is on
DTC P0137 stands for “low voltage in oxygen sensor circuit Bank 1 Sensor 2” according to the SAE J2012 standard (2023 edition). This means the PCM detected that the signal from the second oxygen sensor (located after the catalytic converter) remains low for an extended period.
Why does this happen? The PCM expects that when the mixture is richer, the sensor voltage will rise above 0.4 V. If the voltage drops below this threshold and stays there for an extended period, the system can set P0137.
Why is this important? The rear oxygen sensor does not directly control the fuel mixture—that is the role of the front sensor (Sensor 1). Sensor 2 monitors the catalytic converter’s performance and confirms mixture stability downstream of the catalyst. If its signal is constantly low, the PCM interprets this as either excess oxygen in the exhaust (due to leaks or a lean mixture) or a faulty sensor or circuit.
Conditions for P0137 detection (enable criteria): the PCM initiates sensor 2 testing under specific conditions—usually coolant temperature above 167–176°F (75–80°C), closed-loop fuel control, stable RPM between 1500–3000, and speed above 25 mph (40 km/h). Exact thresholds depend on the PCM calibration and vehicle make—always consult the service manual.
This triggers the Check Engine light, affects emissions monitoring, and may increase fuel consumption if the engine is running lean or there is an exhaust leak.
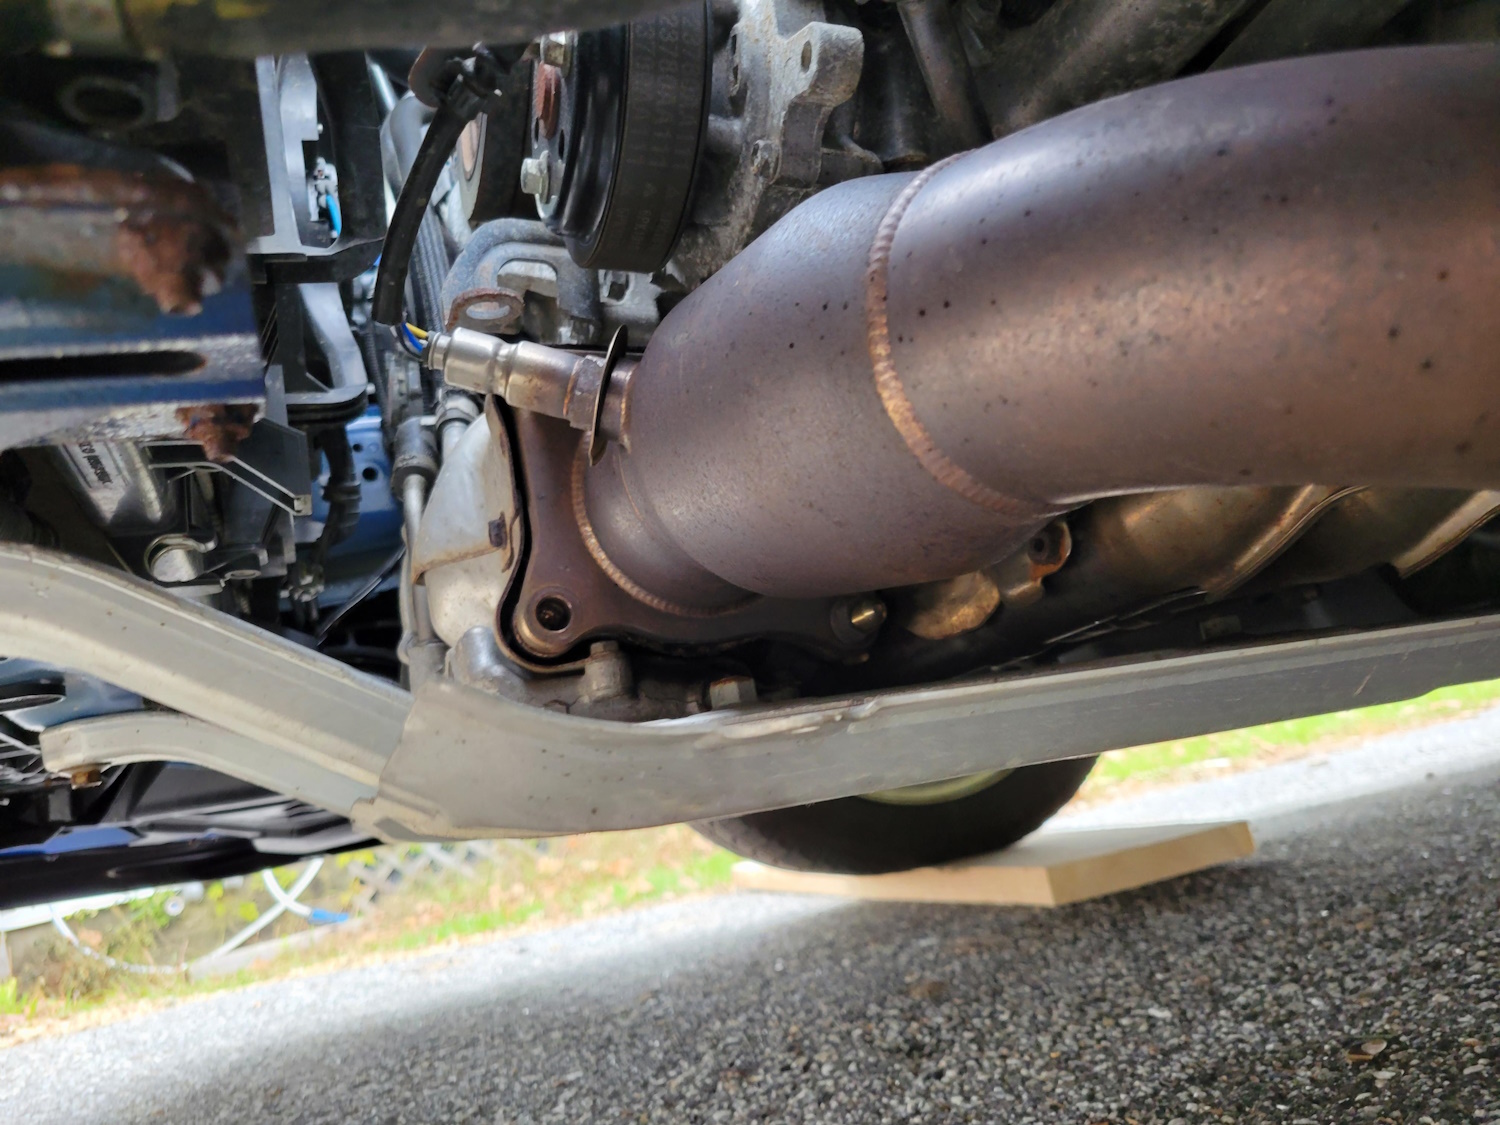
Where is Bank 1 Sensor 2 located and what is the rear O2 sensor responsible for
Bank 1 refers to the engine side where cylinder 1 is located. Inline four-cylinder engines have only one bank (Bank 1). In V-type engines (V6, V8), Bank 1 is often on the passenger side, but exact placement depends on the specific model layout.
Sensor 2 is the rear oxygen sensor installed after the catalytic converter. Its job is to monitor the catalytic converter’s efficiency and confirm the stability of the mixture composition at the outlet. While the front sensor (Sensor 1) actively fluctuates between rich and lean, the rear sensor should show a much smoother signal—indicating the catalytic converter is functioning and smoothing oxygen fluctuations.
Consistently low voltage from Bank 1 Sensor 2 indicates one of three issues: excess oxygen in the exhaust due to leaks or a lean mixture, sensor degradation, or a circuit fault such as an open or short to ground.
Symptoms of code P0137
Symptoms related to P0137
The primary sign is the Check Engine light. Other symptoms may be present but are often subtle since the rear sensor does not actively control fuel delivery.
Increased fuel consumption and exhaust odor. If the engine is running lean or there is an exhaust leak, fuel trims may be affected. This can result in a noticeable exhaust odor.
Unstable idle and fluctuating RPM. If P0137 is caused by a lean mixture or exhaust leak, the engine may misfire or idle unevenly.
Loss of power and sluggish acceleration. A lean mixture can cause reduced throttle response, especially under load.
Acceleration hesitation and jerking. When fuel delivery is affected by an underlying lean condition, performance dips may occur.
Signs of a lean mixture in logs. Viewing fuel trim parameters (STFT/LTFT) in the scanner may show positive values, indicating the PCM is adding fuel to compensate.
It is important to understand that the rear sensor does not directly control the mixture, so symptoms are often subtle. Many drivers notice only the Check Engine light without noticeable changes in vehicle behavior.
Main causes of error P0137
Let’s analyze what actually happens when the PCM records P0137. Causes range from common to rare.
1) Faulty oxygen sensor (B1S2). The sensor’s sensitive element degrades over time due to contamination, thermal cycling, or exposure to oil or silicones. As a result, the sensor stops responding correctly to oxygen changes and outputs a consistently low signal.
2) Exhaust leak before the sensor. Cracks in pipes, burned gaskets, or loose connections allow outside air into the exhaust. Atmospheric oxygen reaches the sensor’s element, causing it to indicate a lean mixture (low voltage) even if the mixture is normal.
3) Wiring issues, poor ground, or short to ground. If the signal wire is broken or grounded, the PCM sees zero or near-zero voltage. Connector corrosion or insulation wear near hot exhaust parts are typical scenarios.
4) O2 sensor heater failure. The heater maintains the sensor’s operating temperature. If it fails, the sensor cools down, response slows, and voltage may drop. Typical heater resistance ranges from 3 to 20 ohms depending on the model.
5) Lean fuel mixture. Low fuel pressure, a clogged fuel filter, dirty injectors, or intake air leaks can cause a lean mixture. Sensor 2 detects excess oxygen and shows low voltage.
6) Sensor contamination. Oil from worn piston rings, coolant from a blown head gasket, or silicones from sealants can deposit on the sensor element, reducing its responsiveness.
7) Faulty or clogged catalytic converter. A blocked or damaged catalyst alters exhaust gas composition. Sensor 2 reacts to this change, shifting its readings.
8) PCM calibration errors. Rarely, tuning or software updates can cause incorrect sensor monitoring parameters, leading to false codes.
How to diagnose error P0137 yourself: step-by-step plan
Diagnosis of P0137 starts not with sensor replacement but with understanding why the PCM recorded low voltage. Here is a step-by-step plan.
Step 1: Scan tool diagnosis. Connect an OBD-II scanner with live data support. Read all codes (including pending and history), record freeze-frame data. Pay attention to related codes—if P0138 (high voltage B1S2), P0139 (slow response), P0140 (no activity), or P0141 (heater fault) are present, they guide the troubleshooting direction.
Step 2: Live data check. Start the engine and open real-time parameters. Find Bank 1 Sensor 2 voltage. Normally, it should hold around 0.6–0.8 V with slight fluctuations (an effective catalyst smooths the signal). With P0137, voltage drops below 0.1–0.2 V and stays there. If the sensor shows no response (0 V), an open circuit or total sensor failure is likely.
Step 3: Visual inspection. Examine the sensor wiring from the connector to the PCM. Check the harness route near hot exhaust parts—insulation may be melted. Inspect the connector for corrosion, moisture, or oxidation. On Kia/Hyundai models, connector corrosion under the vehicle due to road salt is common.
Step 4: Check for air intake and exhaust leaks. Leaks before sensor 2 are a frequent cause of low voltage. Use a smoke machine or apply soapy water to joints on a running engine. Listen for hissing during cold start. Pay special attention to flanges, gaskets, and welds.
Step 5: Multimeter testing. Disconnect the sensor connector. Measure heater resistance—normally 3–20 ohms depending on the sensor model. Check heater power supply (should be about 12 V with the ignition on). Test the signal line for opens and ground faults.
Step 6: Catalytic converter check. Compare temperatures at the catalyst inlet and outlet (using an infrared thermometer). Focus on changes before and after repairs—absolute values depend on the model design. Compare B1S1 and B1S2 sensor behavior in live data: the front sensor should fluctuate actively (rich/lean), the rear sensor smoothly. If the rear sensor fluctuates as actively as the front, the catalyst may have lost efficiency.
Step 7: Oscilloscope (optional). If available, connect an oscilloscope to the sensor 2 signal line and observe the waveform. Sharp drops, zero sections, or no response indicate sensor or circuit faults.
Step 8: Forced enrichment test (to differentiate causes). Create a brief rich condition—quickly press the accelerator or carefully inject a small amount of propane into the intake. Observe B1S2 sensor response in live data. If voltage rises, the sensor reacts and the problem is likely an exhaust leak or lean mixture. If voltage does not change, the sensor is faulty.
| Parameter | Normal | With P0137 |
|---|---|---|
| B1S2 voltage (idle) | 0.6–0.8 V | <0.1–0.2 V |
| Low voltage threshold | – | <0.4 V for an extended period |
| Heater resistance | 3–20 ohms (depends on model) | open or short |
| Heater power supply | ~12 V (ignition on) | 0 V or unstable |
| Signs of exhaust leak | none | hissing, soot near flanges |
Tip: Before replacing the sensor, confirm there are no exhaust leaks. This is a common and inexpensive cause of P0137. Replacing the sensor without fixing leaks will not solve the problem—the code will return.
Normal readings of rear O2 sensor (B1S2): what to look for in live data
Understanding normal behavior is key to accurate diagnosis. Let’s review how the rear oxygen sensor should behave in a healthy system.
Normally, Bank 1 Sensor 2 voltage fluctuates slightly and stays within 0.6–0.8 V. This indicates the catalytic converter is working effectively and smoothing oxygen fluctuations that the front sensor (B1S1) actively detects. The front sensor should show a “sawtooth” pattern—constant transitions between rich (high voltage, >0.8 V) and lean (low voltage, <0.2 V) mixtures. The rear sensor should be much steadier.
With leaks or a lean mixture, B1S2 voltage drops and remains below 0.1–0.2 V. The PCM sees readings inconsistent with expectations and records P0137.
With a faulty catalyst, the rear sensor begins to mimic the front sensor’s behavior—fluctuating actively. This means the catalyst is not performing its function and does not smooth the exhaust.
With sensor failure, the signal either freezes at one level (usually low) or is completely absent (0 V).
When viewing live data, pay attention to two aspects: absolute voltage value and its variation pattern. If B1S2 is consistently low and unresponsive to throttle changes, suspect leaks, a lean mixture, or a faulty sensor. If it fluctuates actively like B1S1, check the catalytic converter.
Methods to fix P0137 fault code
Fixing P0137 depends on the identified cause. Here are three main approaches.
Oxygen sensor replacement
If diagnosis shows Bank 1 Sensor 2 is faulty (low response, zero voltage, contamination, or element degradation), it should be replaced.
How to choose a sensor: select by VIN or OEM part number. Avoid “universal” sensors without factory connectors—their installation requires cutting and splicing wiring, increasing the risk of errors.
Replacement process: use a special oxygen sensor socket (usually 22 mm). Apply penetrating oil to the sensor base and let it soak for 5–10 minutes. Warm up the engine to operating temperature to expand the threads and ease removal.
Unscrew the old sensor counterclockwise. Inspect the threads in the exhaust manifold or pipe—if damaged, thread repair may be necessary.
Apply a thin layer of high-temperature anti-seize to the new sensor’s threads if it lacks factory coating. Screw in the sensor by hand, then tighten to the torque specified in the service manual for the specific model. A typical range is 26–30 lb-ft (35–40 N·m), but verify the exact value. Do not overtighten—it may damage the threads or sensor housing.
Connect the plug and secure the wiring harness with heat protection if needed to prevent insulation contact with hot exhaust parts.
Important: Do not touch the sensor’s sensitive element with your fingers—oil and dirt can distort readings.
Electrical circuit repair
If P0137 is caused by a wiring break, short circuit, or connector corrosion, repairing the circuit will restore normal operation.
Wiring check: test continuity of the signal wire from the sensor to the PCM. Resistance should be low. Infinite resistance indicates an open; near zero to ground indicates a short to ground.
Ground check: ensure the sensor ground is intact and not corroded. Clean contacts and apply dielectric grease where appropriate.
Heater power check: with the ignition on, heater terminals should have about 12 V. If no voltage is present, check fuses and relays supplying the O2 sensors.
Repair: replace damaged wiring sections and restore insulation with heat-shrink tubing. If the connector is corroded or cracked, replace it. Use dielectric grease to protect contacts from moisture.
Fixing exhaust leaks
Exhaust leaks before sensor 2 are among the most common causes of P0137. Incoming oxygen dilutes the exhaust, causing the sensor to show low voltage.
Leak detection: use a smoke machine or apply soapy water to joints on a running engine. Listen for hissing during cold start. Inspect flanges, gaskets, and welds, especially at pipe connections.
Repair: replace burned gaskets and tighten flanges. If a pipe crack is found, weld or replace the section. For a temporary fix, heat-resistant tape can be used, but it does not replace proper repair.
After fixing leaks, recheck for leaks with a smoke machine and verify live data—B1S2 voltage should return to normal.
Clearing the code and verification
After fixing the cause, clear the code with a scanner. Drive in mixed conditions (city and highway) so the PCM completes readiness monitors. Ensure the Check Engine light does not return and check sensor voltage in live data—it should hold steadily between 0.6–0.8 V.
Is it safe to drive with P0137
In short: not recommended. Here’s why.
Risk of catalytic converter damage. If P0137 is caused by a lean mixture or exhaust leak, the condition that caused the code can also lead to catalyst damage if left uncorrected.
Increased fuel consumption. Related fuel control issues can potentially cause noticeable fuel economy loss.
Engine instability. Fluctuating idle, acceleration hesitation, and power loss reduce drivability and comfort.
Failed inspection. P0137 relates to emissions control. In many areas, a vehicle with an active Check Engine light will not pass inspection.
Diagnose and fix P0137 promptly to avoid further costs.
“Driving with P0137 can contribute to catalytic converter damage and may increase fuel consumption. It is not usually an immediate no-drive failure, but delaying repair can lead to more expensive repairs.”
Common mistakes in diagnosis and repair
Mistakes diagnosing P0137 cost time and money. Here are the most frequent.
Replacing the sensor immediately without checking for leaks or wiring issues. The sensor is not always the cause. If the problem is an exhaust leak or wiring break, replacing the sensor will not fix it and the code will return.
Ignoring heater codes (P0141) and slow response codes (P0139). These often accompany P0137 and indicate sensor circuit problems. Diagnose them together.
Using low-quality aftermarket sensors. Cheap sensors may not meet OEM specifications and provide inaccurate readings, resulting in recurring codes or system malfunction.
Clearing the code without fixing the cause. Simply clearing the code does not solve the problem—the Check Engine light will come back after a few miles (kilometers).
Not performing a test drive or checking readiness monitors. After repair, the PCM must complete the monitor cycle to confirm system health. Without this, you cannot be sure the issue is resolved.
Related codes and how to distinguish them
P0137 is one of six codes related to the rear oxygen sensor Bank 1 Sensor 2. Here is how they differ.
P0138 – high voltage B1S2. The PCM detects sensor 2 voltage above 0.9 V for an extended period. Causes: short to +12 V, rich mixture, faulty sensor.
P0139 – slow response B1S2. The sensor reacts too slowly to mixture changes. Causes: sensor contamination, element wear, heater issues.
P0140 – no activity B1S2. The sensor shows no signal changes—stuck at one level. Causes: total sensor failure, open circuit, damaged catalyst.
P0141 – heater fault B1S2. The PCM does not detect expected current through the sensor heater. Causes: heater break, no power, faulty relay.
P0157 – low voltage Bank 2 Sensor 2. Mirror code for V-type engines with a second bank (Bank 2). Symptoms and diagnosis are similar to P0137. If the code alternates between banks, check for exhaust leaks or catalyst damage on both sides.
| Code | Symptom | Likely cause | First test |
|---|---|---|---|
| P0137 | Low voltage | Exhaust leak, open circuit, sensor | Live data voltage, leak inspection |
| P0138 | High voltage | Short to +12 V, rich mixture | Live data voltage, wiring check |
| P0139 | Slow response | Sensor contamination, wear | Oscilloscope, throttle response |
| P0140 | No activity | Sensor failure, open circuit | Live data voltage, wiring check |
| P0141 | Heater fault | Heater break, no power | Heater resistance, power supply |
| P0157 | Low voltage Bank 2 | Similar to P0137, other bank | Bank 2 Sensor 2 voltage, leaks |
Features on popular brands (VAZ, Ford, Kia, VAG, Toyota)
Different brands have their own nuances in diagnosing and fixing P0137.
VAZ. Exhaust leaks at flanges and gaskets due to corrosion are common. Access to the rear sensor is usually straightforward; replacement does not require a lift. Pay attention to gasket quality.
Ford. Rear sensor wiring harness runs near heat shields, which can cause insulation melting. Check wiring from the connector to the PCM, especially near exhaust components.
Kia/Hyundai. Connector corrosion under the vehicle due to road salt is typical. After repair, treat contacts with dielectric grease. Pay attention to PCM software updates for correct catalyst monitoring—consult the dealer for updated calibrations.
VAG (Volkswagen, Audi, Skoda, Seat). Check for PCM software updates that adjust catalyst and sensor diagnostic thresholds. Sometimes P0137 occurs due to outdated calibration rather than an actual fault. Consult the dealer for the latest software version.
Toyota. Increased oil consumption (especially on engines 2AZ-FE, 1AZ-FE) can contaminate the rear sensor. If oil traces are visible on the sensor or in the exhaust, address the oil consumption issue before replacing the sensor.
| Brand | Typical cause | Diagnostic advice | Notes |
|---|---|---|---|
| VAZ | Leaks at flanges, corrosion | Inspect gaskets, use a smoke machine | – |
| Ford | Wiring insulation melting near shields | Check harness near manifold | – |
| Kia/Hyundai | Connector corrosion | Dielectric grease, check PCM updates at dealer | Catalyst calibration updates |
| VAG | Outdated PCM software | Check updates at dealer | Monitoring calibrations |
| Toyota | Sensor contamination from oil consumption | Inspect sensor, fix oil consumption | – |
Step-by-step rear oxygen sensor replacement (HowTo)
If you decide to replace the sensor yourself, follow this guide.
Step 1: Disconnect power. Remove the negative battery terminal to avoid short circuits when unplugging the connector.
Step 2: Lift and secure the vehicle. Use a jack or lift, install stands and chocks. Ensure the vehicle is stable.
Step 3: Disconnect the sensor connector. Locate the rear sensor connector (usually under the vehicle near the exhaust pipe after the catalytic converter). Release the lock and unplug it.
Step 4: Break loose and unscrew the sensor. Apply penetrating oil to the sensor base and let it soak for 5–10 minutes. Warm up the engine to operating temperature to expand the threads. Use a special oxygen sensor socket (22 mm). Unscrew counterclockwise.
Step 5: Install the new sensor. Apply a thin layer of high-temperature anti-seize to the new sensor’s threads if it lacks factory coating. Screw it in by hand, then tighten to the torque specified in the service manual.
Step 6: Connect the plug and secure the harness. Ensure the lock clicks. Route the harness with heat protection if near hot exhaust parts.
Step 7: Clear the code and perform a test drive. Connect a scanner and clear P0137. Drive in mixed conditions so the PCM completes readiness monitors. Verify the Check Engine light does not return.
After repair: code reset, readiness cycle, and checks
After fixing P0137, be sure to perform these steps.
Code reset. Use an OBD-II scanner to clear the code. Without this, the Check Engine light will remain on even if the problem is fixed.
Readiness monitors. The PCM must complete the readiness cycle. Check monitor status in the scanner—all should show “ready.”
STFT/LTFT control. Open fuel trim parameters in live data. Values should be near zero (±5–10%). Large positive or negative trims may indicate other fuel or intake issues.
B1S2 voltage stability. Check rear sensor voltage in live data. It should hold steadily between 0.6–0.8 V with slight fluctuations.
Exhaust leak recheck. If a leak was repaired, inspect the area again. Ensure no hissing, soot, or gas odors.
Wiring visual check. If the sensor circuit was repaired, verify insulation does not contact hot exhaust parts and the connector is protected from moisture.
| Action | Purpose | Expected result |
|---|---|---|
| Code reset | Remove P0137 from PCM memory | Check Engine light off |
| Readiness cycle | Confirm system health | All monitors show “ready” |
| STFT/LTFT check | Verify fuel trims | Values ±5–10% |
| B1S2 voltage | Check sensor signal stability | 0.6–0.8 V, slight fluctuations |
| Exhaust leak check | Confirm no leaks | No hissing, soot, or exhaust smell |
Environmental impact and inspection
Code P0137 is directly related to emissions control. The rear oxygen sensor monitors catalytic converter efficiency—a key component reducing CO (carbon monoxide) and HC (unburned hydrocarbons) emissions. If the sensor provides incorrect data, the PCM cannot properly assess catalyst performance, potentially causing emissions to exceed legal limits.
In most states, a vehicle with an active Check Engine light will fail inspection. Testing facilities check readiness monitors via OBD-II—if the catalyst monitor status is “not ready” or a code is stored, the vehicle may fail inspection.
Fixing P0137 not only restores proper engine operation but also contributes to environmental protection. A functioning sensor and catalyst reduce harmful emissions, and normalized fuel trims can help lower fuel consumption.
This content is for educational purposes only, does not replace professional inspection, and is not a repair manual. When working on vehicles, observe safety precautions, follow manufacturer instructions, and use quality replacement parts.
Frequently asked questions
Which sensor part number should I choose for my car?
Select the sensor based on your vehicle’s VIN or OEM part number. Bank 1 Sensor 2 is the rear sensor on the side of cylinder 1, installed after the catalytic converter. Pay attention to the harness length and connector type—they must match the factory wiring. Avoid “universal” sensors without connectors unless you have experience with wire cutting and crimping.
Will cleaning the O2 sensor help with error P0137?
Cleaning makes sense only if the sensor is contaminated (oil, soot, silicone) and the sensitive element has not yet degraded. Signs include slow sensor response (code P0139) but a functioning heater. If the cause of P0137 is a wiring break, exhaust leak, or damage to the sensitive element, cleaning will not help. In most cases, replacing the sensor is more effective.
Is it possible to drive temporarily with error P0137?
In short—yes, carefully. But it is better to fix the cause immediately. Prolonged driving with an active P0137 increases the risk of catalytic converter damage, raises fuel consumption, and may cause a failed inspection. Do not delay diagnosis.
What is the difference between a “universal” and an OEM sensor?
An OEM sensor has a factory connector and guaranteed compliance with manufacturer specifications. A universal sensor often comes without a connector—requiring wire cutting and crimping, which increases the risk of installation errors and corrosion. High-quality aftermarket sensors with connectors (for example, Denso or Bosch) can be close to OEM in performance.