Code P0011 is a diagnostic trouble code indicating that the engine control module has detected excessive advance in the intake camshaft position on bank 1. In simple terms, the ECM sees that the actual camshaft angle is ahead of the target value set by the program, or the VVT system is unstable and cannot maintain the correct valve timing. This is not just a “sensor error”—it signals a real malfunction in the variable valve timing mechanism.
“P0011 appears when the ECM detects the camshaft has shifted where it shouldn’t be. This is not a random glitch—it results from specific conditions: oil pressure, VVT valve condition, chain wear. My goal is to teach you to read this error as a chain of causes, not a death sentence for the engine.” – Daniel Brooks, DecodeAuto
Below we will explain what P0011 means, why it occurs, how to diagnose it step-by-step, and what actions can fix the problem so the VVT system operates correctly again.
Page contents
What is code P0011? decoding and essence of the problem
P0011 means: “Camshaft Position ‘A’ – Timing Over-Advanced or System Performance – Bank 1.” The ECM detects that the actual intake camshaft angle on bank 1 is advanced beyond the allowable threshold compared to the target value, or the variable valve timing system (VVT/VVT-i/CVVT) fails to reach target parameters and remains stuck in an advanced position.
Official definition (A – Camshaft Position – Timing Over-Advanced or System Performance – Bank 1)
According to the SAE J2012 standard (OBD-II diagnostic codes), P0011 is classified as a generic powertrain DTC applicable to all manufacturers using the OBD-II/EOBD protocol. The official description is: “Camshaft Position ‘A’ – Timing Over-Advanced or System Performance (Bank 1).”
What this means in practice:
- Camshaft Position “A” refers to the intake camshaft on bank 1, i.e., the side of the engine where cylinder #1 is located.
- Timing Over-Advanced means the actual camshaft position leads the target set by the ECM by an amount typically exceeding 5–14 degrees (exact range depends on manufacturer calibrations and engine model).
- System Performance indicates the VVT system cannot properly control valve timing due to mechanical, hydraulic, or electrical issues.
The ECM compares signals from the camshaft position sensor (CMP) and crankshaft position sensor (CKP), calculates the actual advance angle, and compares it to the desired angle. If the deviation exceeds tolerance (usually over 5–10° per manufacturer data) and persists for a set time (typically 2–5 seconds under conditions such as a warmed-up engine, RPM between 1160–6000, and oil temperature from 16°F to 212°F (−9°C to +100°C), according to general detection parameters), the code is stored in ECM memory and the check engine light is activated.
Note on sources:
Threshold values and detection conditions are based on typical calibrations described in technical manuals and expert discussions. Exact parameters may vary by manufacturer and engine model—always consult the specific vehicle repair manual or current TSBs.
How the VVT system works in simple terms
The variable valve timing (VVT) system adjusts the timing of intake and exhaust valve opening and closing depending on engine speed, load, and temperature. This improves torque at low RPM, increases power at high RPM, and reduces fuel consumption.
Operating principle:
- The ECM analyzes parameters such as engine speed, throttle position, coolant and oil temperature, and data from CMP/CKP sensors.
- The ECM sends a control signal (usually pulse-width modulation, PWM) to the oil control valve solenoid (VVT solenoid, also called OCV or CVVT solenoid).
- The solenoid opens an oil passage, directing pressurized engine oil into the hydraulic actuator (phaser, VVT phaser, VANOS actuator) mounted on the camshaft end.
- The actuator shifts the camshaft relative to the timing gear. Oil fills chambers inside the actuator (divided into advance and retard sections) and rotates the rotor, adjusting the camshaft angle by 20–60 degrees forward (advance) or backward (retard).
- The ECM receives feedback from the camshaft position sensor (CMP) and adjusts solenoid control to maintain the desired angle.
If oil pressure is low (low level, contamination, worn pump), the solenoid sticks, or the actuator is worn, the control angle may freeze in an advanced position or fluctuate erratically—triggering P0011.
Severity and is it drivable?
The severity of code P0011 ranges from moderate to high depending on the nature of the symptoms and how long the vehicle is driven with the active fault.
Why it matters:
- Symptoms may worsen: initially mild power loss, rough idle, slight increase in fuel consumption. Over time, there may be a risk of detonation, harsh engine operation, and stalling at stops.
- Prolonged driving is risky: accelerated wear of the timing chain and VVT actuator, clogging of oil passages with wear debris, and possible chain jump (leading to valve-to-piston contact in interference engines).
- Risk of catastrophic engine damage—if the timing chain jumps on an interference engine (where piston and valve paths intersect), valves may bend, and pistons and the cylinder head may be damaged.
Operational recommendations:
- Immediately check oil level and condition (low level or thick/dark oil is a common cause).
- If the engine runs smoothly without knocking or stalling, it may be possible to drive briefly (within reason, ideally to the nearest repair shop) for diagnostics.
- If pronounced symptoms occur (knocking from the timing chain area, strong vibration, frequent stalling, misfires, metallic rattling), stop driving and perform on-site diagnostics or tow the vehicle.
“If P0011 is accompanied by knocking under the valve cover and oil pressure drop on the dashboard, stop driving immediately. Continuing under these conditions can very likely cause chain jump and valve train damage.” – recommendation from a service advisor (DecodeAuto practical comment)
Main symptoms of code P0011
Symptoms of P0011 indicate issues with variable valve timing control: the ECM cannot hold the camshaft in the commanded position, affecting engine performance. Key signs include check engine light activation, unstable engine operation (especially at idle), noticeable power loss, and increased fuel consumption. Starting difficulties and unusual noises from the timing chain area may occur. The longer symptoms are ignored, the higher the risk of worsening faults and related codes (P0010, P0012, P0016).
Typical symptoms list:
- Check engine light on—the first and most obvious sign; P0011 is stored in ECM memory and triggers the warning lamp.
- Unstable idle—RPM fluctuates (±100–200 RPM), engine shakes or stalls at traffic lights.
- Power loss, sluggish acceleration—the vehicle responds slower to throttle input, especially during passing or uphill driving.
- Increased fuel consumption—incorrect valve timing disrupts mixture formation, and the ECM compensates by increasing fuel delivery (fuel trim may shift positive).
- Hard or prolonged engine start—starter cranks longer (especially during cold starts), engine starts with delay and runs unevenly.
- Unusual noises under the hood—knocking, rattling, or rustling near the cylinder head/valve cover (sign of VVT actuator sticking, chain stretch, or tensioner wear).
| Symptom | Likely problem area | Priority action |
|---|---|---|
| Idle fluctuates | Oil (level/quality), VVT solenoid | Check oil level, inspect solenoid |
| Timing chain noises, knocking | Timing chain, tensioner, VVT actuator | Check timing marks, chain condition, tensioner |
| Hard start | CMP/CKP sensors, timing marks, low oil pressure | Check timing mark synchronization, sensor signals |
| Power loss | VVT system (solenoid/actuator), low oil pressure | Check oil pressure, solenoid operation |
| Increased fuel consumption | Incorrect valve timing (VVT), related fuel codes | Check fuel trim parameters, VVT desired vs actual |
Main causes of code P0011
Causes of P0011 relate to faults in the VVT system components and engine maintenance issues. Diagnosis should proceed from simple to complex: first check oil level and quality, then the VVT solenoid and wiring, and only afterward the mechanical parts (timing chain, actuator, sensors). This approach helps quickly identify the root cause and avoid unnecessary replacement of good parts.
Logical diagnostic flowchart for P0011 causes (by priority):
- Check oil (level, viscosity, contamination) → if faulty, fix, clear code, check for recurrence.
- Check VVT solenoid (resistance, mechanical operation, filter screen) → if faulty, clean or replace.
- Check solenoid wiring and connector (oxidation, breaks, shorts) → if damaged, repair as needed.
- Check timing marks (alignment, chain stretch, tensioner wear) → if misaligned, adjust or replace kit.
- Check VVT actuator (sticking, wear) → if faulty, replace.
- Check CMP/CKP sensors and ECM software (rare but possible calibration issue) → if TSB available, update.
Low level or poor quality engine oil
This is one of the most common causes of P0011 (based on specialized forum discussions and repair shop experience—often a primary cause observed by mechanics).
Why oil affects VVT:
- Insufficient oil level reduces pressure in the oil circuit—the solenoid opens, but not enough oil reaches the actuator to shift the camshaft. The actuator may stick in an intermediate position, and the ECM records advance (or cannot return the camshaft to its base position).
- Oil aging and viscosity changes—thick oil (especially at low temperatures or with extended change intervals) flows slowly through narrow passages and the solenoid filter. Thin oil (incorrect viscosity) may fail to generate the required pressure.
- Oil contamination with wear particles, soot, and varnish deposits clogs oil passages in the cylinder head and the solenoid filter screen. Oil flow is restricted, and the actuator malfunctions.
- Clogged oil filter—if blocked, the bypass valve opens and unfiltered oil circulates, accelerating solenoid and passage contamination.
- Worn oil pump—may fail to maintain sufficient pressure (especially at idle), causing VVT system interruptions.
What to check:
- Oil level on dipstick (should be between MIN and MAX; if below MIN, top off with oil of the same viscosity).
- Oil condition: color (clean—light amber; normal aging—dark brown; heavily contaminated—black), texture (rub a drop between fingers—gritty or grainy indicates contamination), smell (burnt or fuel odor indicates degradation or fuel dilution).
- Oil change intervals: if oil has not been changed for a long time (e.g., over 6,000–9,000 miles (10,000–15,000 km) or more than 1 year depending on manufacturer recommendations), this is a likely cause.
- Viscosity compliance with manufacturer specifications (listed in the owner’s manual): e.g., 5W-30, 5W-40, 0W-20 depending on climate and engine model.
- Oil pressure (check with a mechanical gauge at idle and higher RPM; if below spec, there may be an issue with the pump or internal leaks).
What to do:
- Replace oil and oil filter with quality products meeting OEM specifications.
- If passages are heavily clogged, flush the oil system with a special cleaner (carefully, following manufacturer instructions) or use a short-interval oil change approach to help remove deposits.
Faulty VVT valve (solenoid) or actuator
The VVT solenoid (Oil Control Valve, OCV) is an electromagnetic valve that regulates oil flow to the camshaft actuator on ECM command. The actuator (VVT phaser) is a hydromechanical device that physically shifts the camshaft.
Typical solenoid faults:
- Valve sticking due to varnish deposits—oil deposits gum up the solenoid’s moving core, causing it to stick open or closed. The ECM sends control signals, but oil flow is not regulated, leaving the camshaft advanced.
- Seizure—the core is fully blocked, and the solenoid does not respond to ECM signals.
- Coil burnout—open or short circuit in the solenoid coil (checked with a multimeter: coil resistance should be within a specific range depending on model; infinite or near-zero resistance indicates failure).
- Clogged filter screen at solenoid inlet—dirt particles block oil flow.
Typical actuator (phaser) faults:
- Worn internal seals—oil leaks between advance and retard chambers, and the actuator cannot hold the commanded angle.
- Rotor seizure—due to contamination or mechanical wear, the rotor sticks, fixing the camshaft in an advanced position.
- Low oil pressure—the actuator relies on hydraulics; insufficient pressure prevents camshaft shifting or causes slow response.
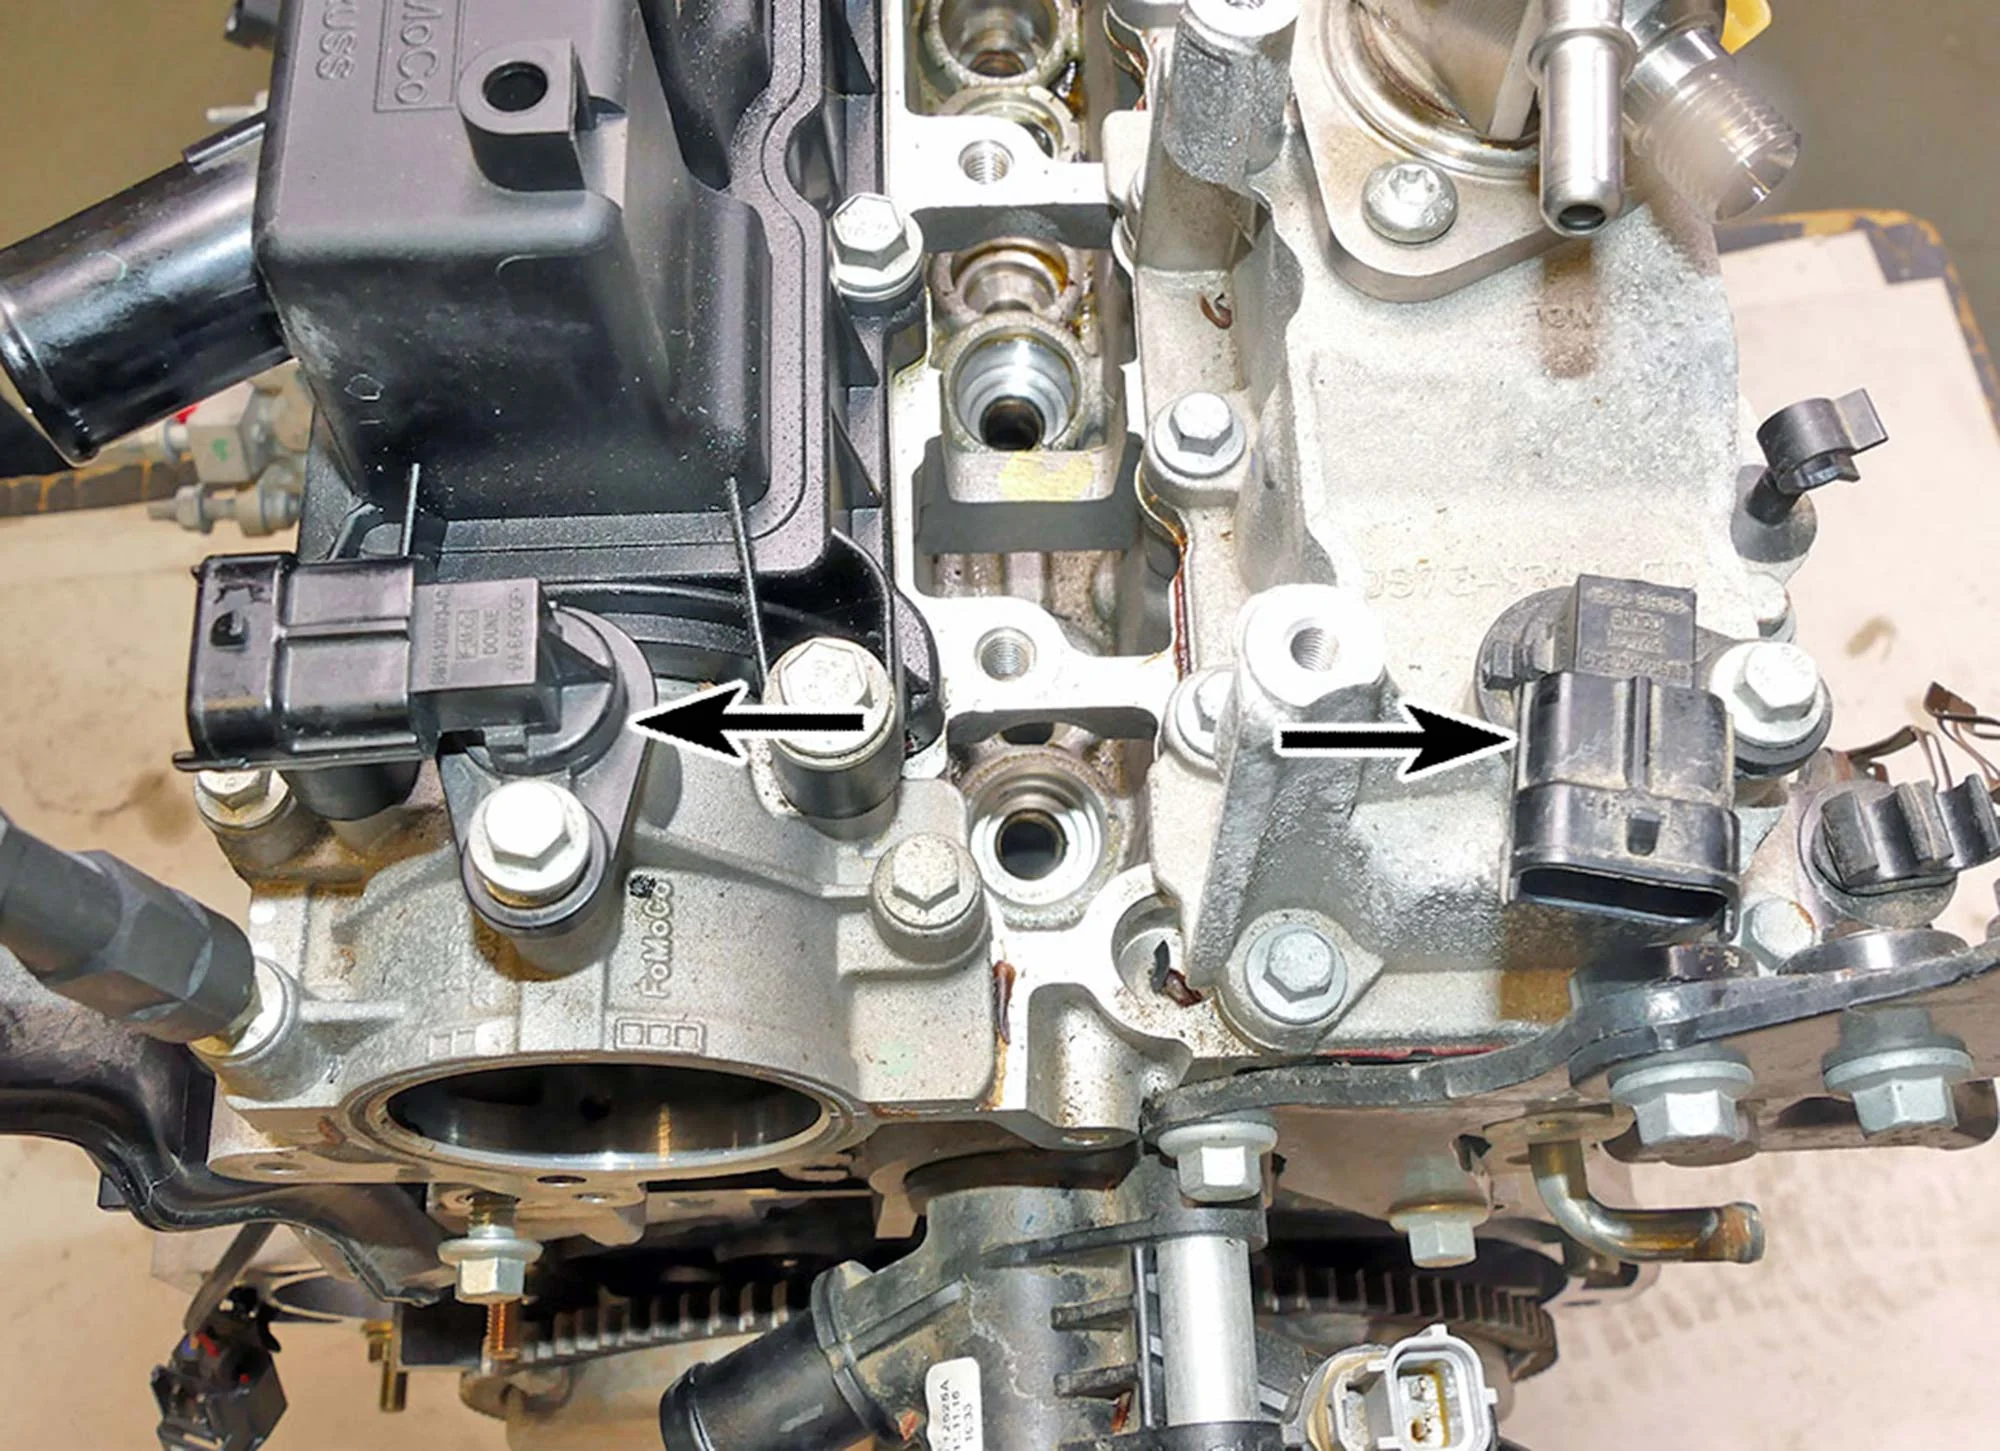
How to check the solenoid:
- Visual inspection: remove the solenoid (usually secured by one bolt on the cylinder head), inspect the filter screen at the inlet. If clogged, clean with carburetor cleaner or solvent.
- Measure coil resistance with a multimeter between solenoid connector pins (disconnect connector). Normal range depends on model (see repair manual). Replace solenoid if out of range.
- Check mechanical operation: briefly (1–2 seconds) apply 12 V from the battery to the solenoid terminals. A working solenoid should click (core activation) and allow airflow (blow gently into the oil channel—the flow resistance should change when voltage is applied).
How to assess the VVT actuator:
- Visual inspection with valve cover removed (if accessible): check rotor play and seal condition.
- Use a scanner (live data): compare VVT Desired (target angle) and VVT Actual (actual angle) at idle and higher RPM. If Actual does not follow Desired or freezes, the actuator is worn.
What to do:
- Clean the solenoid and filter screen (soak in cleaner, blow out with compressed air).
- If the solenoid is electrically or mechanically faulty, replace it with a new OEM or quality aftermarket part.
- If the actuator is worn, replace the camshaft phaser assembly (usually requires partial engine disassembly).
Timing chain issues: stretch or jump
Timing chain stretch and wear of timing drive components (tensioner, guide rails) can cause timing mark misalignment and valve timing shifts. The ECM detects that the actual camshaft angle does not match the target and logs P0011.
How this happens:
- Chain stretch—over time (usually after significant mileage, depending on brand and conditions), chain links elongate, increasing slack. Timing marks on camshaft and crankshaft sprockets shift relative to marks on the block or cover.
- Tensioner wear—the tensioner plunger loses force, the chain slackens, and it may jump a tooth.
- Guide wear—guides wear out, causing the chain to slap against the cover.
- Tooth jump—in critical cases, the chain may jump a sprocket tooth, instantly shifting valve timing (risking valve-to-piston contact in interference engines).
Typical signs of timing chain problems:
- Diesel-like noise or metallic knocking at idle (chain slack causing contact).
- Related trouble codes: P0016 (CMP/CKP sensor correlation), P0335/P0340 (intermittent CMP/CKP sensor signals).
- When checking timing marks (remove cover, rotate crankshaft to TDC of cylinder 1), sprocket marks do not align with block or cover marks.
How to check:
- Remove the valve cover and timing chain cover (if accessible).
- Rotate the crankshaft with a special tool (or the crank pulley bolt) to align the crankshaft pulley mark with the block mark (TDC cylinder 1).
- Check alignment of the camshaft sprocket marks with the cylinder head or timing cover marks. Misalignment indicates chain stretch or jump.
- Assess chain slack: pull the chain at the midpoint between sprockets—significant slack indicates stretch.
- Check tensioner condition (hydraulic—plunger travel; mechanical—spring force) and guide wear (cracks, damage).
What to do:
- If the chain is stretched or has jumped, replace the entire timing kit (chain, sprockets, tensioner, guides, gaskets).
- Check and set timing marks strictly according to manufacturer instructions.
- After replacement, reset ECM adaptations (clear codes and perform a VVT relearn procedure if available).
Electrical issues: wiring break or poor connector contact
The electrical circuit of the VVT solenoid and CMP/CKP sensors is prone to connector oxidation, wiring breaks, or short circuits. Unstable contact distorts the ECM control signal, causing solenoid malfunction or failure to actuate, and the ECM logs P0011.
Typical problems:
- Oxidized VVT solenoid connector contacts—moisture, salt, and oil cause oxide film formation, increasing circuit resistance and reducing voltage or interrupting the signal.
- Wiring breaks—wires in the harness may fracture (especially at bends or near moving engine parts) or be damaged by vibration/heat.
- Short circuits or coil winding faults—the solenoid receives incorrect voltage, and the ECM may log a control circuit code (P0010) along with P0011.
- Poor ECM or solenoid ground—an oxidized or loose ground connection causes unstable control circuit operation.
How to check:
- Visual inspection of the solenoid connector: disconnect it and inspect pins for oxidation (green/white deposits), corrosion, damage, and oil contamination. Clean contacts with electrical contact cleaner and dry.
- Wiring check with a multimeter:
- Disconnect the solenoid and ECM connectors (or use a wiring diagram to access pins).
- Measure resistance between the solenoid connector pins and the corresponding ECM pins (should be near zero, indicating wire continuity).
- Check insulation: measure resistance between each wire and chassis ground (should be infinite; any conductivity indicates a short to ground).
- Power and ground check:
- Turn the ignition on (engine off), measure voltage at the solenoid power pin (usually +12 V with ignition on).
- Check ground: measure resistance between the solenoid ground pin and the battery negative terminal (should be near zero).
- Inspect the ECM connector: check for oxidation, moisture intrusion, and pin damage.
What to do:
- Clean oxidized contacts and apply dielectric grease.
- Repair damaged wires (solder with heat-shrink tubing or replace the harness section).
- Replace the connector if contacts are severely worn or damaged.
- Restore ECM and solenoid ground connections (clean and tighten mounting bolts).
CMP/CKP sensor or ECM logic malfunction
Incorrect signals from the camshaft position sensor (CMP) and crankshaft position sensor (CKP) can distort synchronization used by the ECM to calculate valve timing. Rarely, ECM software issues can cause false P0011 codes, resolved by calibration updates.
Typical sensor issues:
- Contaminated CMP/CKP sensors (metal shavings, oil on the sensor) distort the magnetic field, causing unstable signals.
- Increased gap between the sensor and toothed wheel (due to mounting wear or deformation) reduces signal amplitude, causing missed pulses.
- Damaged toothed wheel (chips, tooth wear) causes intermittent signals.
- Electromagnetic interference—sensor wires routed near high-voltage circuits (ignition coils, spark plug wires) pick up noise.
ECM software issues:
- Some vehicle models have known cases where outdated ECM calibrations misinterpret sensor signals and log P0011 despite correct mechanical timing. Manufacturers issue technical service bulletins (TSBs) with software updates.
How to check:
- Oscilloscope analysis of CMP/CKP signals (requires an oscilloscope or diagnostic scanner with oscilloscope function): assess signal shape, amplitude, and pulse gaps. A good signal shows clear rectangular pulses with uniform intervals.
- Check sensor power and ground with a multimeter (similar to the solenoid check).
- Visual inspection of the toothed wheel (if accessible) for tooth condition.
- Check sensor wiring shielding—ensure wires are not routed near high-voltage circuits.
- Search for manufacturer TSBs—check official websites or service bulletin databases for software updates for the specific model and year.
What to do:
- Clean sensors and check gaps (exact values in the repair manual).
- Replace faulty sensors.
- Re-route wiring and add shielding if needed.
- Update ECM software per TSB (performed at a dealership or specialized repair shop with access to factory calibrations).
Note on TSB sources:
Access to current TSB PDFs is limited. For specific bulletins, contact a dealer or use a service information database (AllData, Mitchell1, MOTOR). The information here summarizes typical models with known P0011 software updates.
How to diagnose code P0011: step-by-step guide
Diagnosing P0011 requires a systematic approach: from reading codes with a scanner to inspecting physical components. The goal is to identify the root cause (not just symptoms) and fix it.
Step-by-step algorithm:
Step 1: Read codes and freeze frame data
- Connect an OBD-II diagnostic scanner to the vehicle’s port (usually under the steering column).
- Turn the ignition on (engine off).
- Read stored diagnostic trouble codes (DTCs). Record P0011 and any related codes (P0010, P0012, P0016, P0021, P0022, etc.).
- Review freeze frame data (snapshot of parameters at code occurrence): engine RPM, coolant temperature, engine load, CMP/CKP sensor readings, VVT parameters (if available).
- Analyze related codes: if P0010 (solenoid control circuit) is present, start with a wiring check; if P0016 (CMP/CKP mismatch) is present, check timing marks.
Step 2: Check oil level and quality
- Warm the engine to operating temperature (176–194°F / 80–90°C), shut it off, and wait a few minutes.
- Remove the dipstick, wipe it dry, reinsert it fully, remove it again, and check the level (should be between MIN and MAX).
- Assess oil condition:
- Color: light amber (new), dark brown (normal aging), black (heavily contaminated).
- Texture: rub a drop between fingers—gritty or grainy indicates contamination.
- Smell: burnt odor indicates overheating or severe use; a fuel smell indicates fuel dilution (fuel system fault).
- Check the oil filler cap for emulsion (light brown foam), which may indicate coolant contamination (such as a blown head gasket).
- If the level is low or the oil is dirty, replace the oil and filter, clear the code, run a test cycle, and check for recurrence.
Step 3: Check oil pressure
- Connect a mechanical oil pressure gauge to the oil pressure sensor port (use an adapter if needed).
- Start the engine and warm it to operating temperature.
- Measure pressure at idle (typically 600–900 RPM): values vary by engine model (see manual).
- Increase RPM to a higher level (e.g., 3000 RPM): pressure should rise accordingly.
- If pressure is below specification, inspect the oil pump, seals, and oil pickup for leaks or blockages.
Step 4: Check VVT solenoid
- Remove the solenoid (usually one bolt on the cylinder head; disconnect the connector and drain a small amount of oil into a container).
- Inspect the filter screen at the solenoid inlet: if clogged, soak the solenoid in carburetor cleaner for 15–20 minutes, then blow it out with compressed air.
- Measure coil resistance with a multimeter (contacts on solenoid): normal range depends on model. Replace if out of range.
- Test mechanical operation: briefly apply 12 V to the solenoid terminals—you should hear a click. Blow through the oil channel—flow resistance should change when energized.
- Replace the solenoid if faulty.
Step 5: Visual inspection of wiring and connector
- Disconnect the VVT solenoid connector and inspect the pins for oxidation, corrosion, and damage.
- Inspect the wiring harness for exposed wires, bends, and signs of melting.
- Check the ECM connector condition (if accessible).
- Measure wire resistance between the solenoid connector and ECM (should be near zero).
- Check insulation resistance to ground (should be infinite).
- Repair wiring and clean contacts if damaged.
Step 6: Compare VVT parameters on scanner (live data)
- Connect the scanner, start the engine, and warm it to operating temperature.
- Open the live data section and locate parameters:
- VVT Intake Desired (target intake cam angle)
- VVT Intake Actual (actual cam angle)
- Oil Temperature
- Engine RPM
- Long/Short Fuel Trim
- Observe parameters at idle and higher RPM:
- Normal: deviation between Desired and Actual within allowable limits (manufacturer-specific).
- Deviation: if Actual significantly leads Desired and does not return, there may be an issue with the actuator, solenoid, or oil pressure.
- Freeze: if Actual remains fixed and does not respond to RPM changes, the solenoid or actuator is stuck.
- Check CMP/CKP synchronization: angles should be stable without jumps (sudden changes indicate missed pulses).
Step 7: Check timing marks
- Remove the upper timing cover.
- Rotate the crankshaft with a special tool (or crank pulley bolt) to align the crank pulley mark with the block mark (TDC cylinder 1).
- Check camshaft sprocket mark alignment with the cylinder head or timing cover marks. Marks must match exactly.
- Assess chain slack: pull the chain at the midpoint between sprockets—significant slack indicates stretch.
- Check tensioner condition (plunger travel, spring force) and guide wear (cracks, damage).
- If marks are misaligned or the chain is stretched, replace the timing kit.
Step 8: Check CMP/CKP sensors (if needed)
- Remove sensors and inspect the sensing surface for contamination (metal shavings, oil).
- Check sensor gap to the toothed wheel (exact value in the repair manual).
- Analyze signal waveform with an oscilloscope: the signal should be clear without pulse loss.
- Replace faulty sensors.
| Parameter (PID) | Typical values | Deviation → Action |
|---|---|---|
| VVT Desired vs Actual | Deviation within allowable range | Deviation above spec → check oil, solenoid, actuator |
| Oil Temperature | 176–212°F (80–100°C) (operating) | Low temperature → warm engine before test |
| Engine RPM | Stable RPM | Fluctuating RPM → check idle control system |
| CMP/CKP Sync | Stable angles, no jumps | Angle jumps → check sensors, timing marks |
| Long/Short Fuel Trim | Within normal range near zero | Significant deviation → possible air leaks, fuel system issues |
Methods to fix code P0011
Fixing P0011 starts with simple steps (oil change, solenoid cleaning) and progresses to more complex repairs (timing chain, VVT actuator replacement). After any repair, clear the code and perform a test cycle to make sure it does not return.
Repair algorithm:
1. Oil and oil filter replacement
- When: low level, contamination, or incorrect viscosity.
- How: drain old oil (warm engine to operating temperature, remove drain plug), replace oil filter, refill with oil of the proper viscosity and specification (per the owner’s manual).
- Oil volume: typically 4.2–5.8 qt (4.0–5.5 liters), depending on engine model; exact amount is in the manual.
- Difficulty: low.
- Time: approx. 0.3–0.6 labor hours.
2. Cleaning or replacing VVT solenoid
- When: solenoid sticking, clogged filter screen, coil resistance normal.
- How (cleaning): remove solenoid, soak in carburetor cleaner for 15–20 minutes, blow out with compressed air, reinstall with a new sealing ring.
- How (replacement): remove old solenoid, install a new OEM or quality aftermarket part, connect wiring.
- Difficulty: medium.
- Time: approx. 0.5–1.0 labor hours.
3. Repair or replacement of wiring and connector
- When: oxidized contacts, wire breaks, short circuits.
- How: clean connector contacts with electrical contact spray, repair damaged wires (solder with heat-shrink tubing or replace the harness section), replace connector if severely worn.
- Difficulty: low to medium.
- Time: approx. 0.5–2.0 labor hours depending on damage extent.
4. Replace VVT actuator (phaser)
- When: actuator worn, stuck, cannot hold angle (VVT Actual freezes or deviates significantly from Desired).
- How: partial engine disassembly (remove valve cover, possibly timing cover), remove old actuator from camshaft, install new one, reassemble, and check timing marks.
- Difficulty: high.
- Time: approx. 2–4 labor hours.
5. Replace timing chain and kit
- When: chain stretched (significant slack), timing marks misaligned, tensioner/guide wear.
- How: front engine disassembly (remove accessory belts, crankshaft pulley, timing cover), remove old chain, sprockets, tensioner, guides, install new kit, set timing marks per manual, reassemble.
- Difficulty: high.
- Time: approx. 4–8 labor hours depending on engine model and accessibility.
6. ECM software update (if applicable)
- When: manufacturer TSB available for calibration updates to fix false P0011 triggers.
- How: visit a dealer or specialized repair shop with access to factory software and perform ECM reprogramming.
- Difficulty: low (for the vehicle owner; requires specialized equipment).
- Time: approx. 0.5–1.0 labor hours.
7. Code reset and verification
- When: after any repair.
- How: connect a scanner, clear stored codes, start the engine, complete a test cycle (idle, city, highway), and re-scan for codes. If P0011 does not return, the issue is resolved.
| Problem | Solution | Difficulty | Approximate time (labor hours) |
|---|---|---|---|
| Dirty/incorrect oil | Oil and filter replacement | Low | 0.3–0.6 |
| Clogged VVT solenoid | Clean filter and housing | Medium | 0.5–1.0 |
| Faulty VVT solenoid | Solenoid replacement | Medium | 0.5–1.0 |
| Oxidized connector/wiring | Clean/repair wiring | Low–Medium | 0.5–2.0 |
| Worn VVT actuator | Phaser replacement | High | 2–4 |
| Stretched timing chain | Timing kit replacement (chain, sprockets, tensioner) | High | 4–8 |
| ECM software issue | Calibration update (per TSB) | Low* | 0.5–1.0 |
*For vehicle owners; requires a specialized repair shop.
Safety warnings:
- Handling hot oil: allow the engine to cool to a safe temperature before draining oil; use protective gloves.
- Thread locker: apply medium-strength thread locker when installing a new solenoid/actuator if recommended by the manufacturer.
- Tightening torque: follow specified bolt torque values (see repair manual).
- Oil disposal: dispose of used oil at authorized collection points; do not pour it into drains or onto the ground.
P0011 specifics on popular vehicles
Different vehicle brands have typical P0011 causes related to VVT system design, material quality, and operating conditions. Below are generalized scenarios for common models.
| Brand/Engine | Typical P0011 cause | Quick test | Common fix |
|---|---|---|---|
| Hyundai/Kia (G4KD/GDI) | CVVT solenoid filter clogging | Check oil, inspect solenoid filter | Oil change, solenoid cleaning, ECM software update |
| Nissan (QR/HR) | VVT actuator wear, timing chain stretch | Check oil pressure, timing marks, chain slack | Timing kit replacement, CVTC actuator replacement |
| Subaru (EJ/FB) | Low oil level, AVCS valve sticking | Check oil level (full), inspect AVCS valve | Maintain oil level, clean/replace AVCS valve |
| VAZ/LADA (21126 16V) | Oil passage clogging, timing tensioner wear | Check oil quality, timing chain condition | Oil change, oil passage cleaning, tensioner/guide replacement |
Prevention and regular maintenance
Preventing P0011 involves keeping the VVT and timing system in good condition and performing regular engine maintenance. Simple measures reduce the risk of this code.
Prevention recommendations:
- Change oil according to time and mileage, considering severe operating conditions.
- Standard interval (light use): per manufacturer recommendations in the owner’s manual.
- Severe conditions (short trips, frequent cold starts, city driving, dusty environment, low temperatures): shorten interval per manufacturer advice.
- For turbocharged or GDI/FSI engines, a shorter interval may be recommended.
- Use oil with viscosity and specifications recommended by the manufacturer (OEM).
- Check specifications in the owner’s manual (usually on the oil filler cap or in the service information).
- Examples: API SN/SP, ACEA A3/B3, A5/B5, viscosity depending on climate and model year.
- Use quality oil filters (OEM or trusted brands).
- Periodically clean the VVT valve/filter if accessible.
- If engine design allows easy solenoid removal (without major disassembly), perform preventive cleaning of the filter screen per the maintenance schedule.
- Use flushing additives cautiously during oil changes, following instructions.
- Monitor oil leaks and level, check at every service.
- Inspect the engine for oil leaks (gaskets, seals, sensors, valve cover).
- Regularly check oil level (especially for engines with high oil consumption).
- Address leaks promptly.
- Listen for timing chain noises and diagnose at the first signs.
- Knocking, rattling, or rustling at idle or startup may indicate chain stretch, tensioner wear, or VVT actuator issues.
- If noises appear, perform diagnostics (check timing marks, chain slack, tensioner condition).
| Operation | Frequency | Notes |
|---|---|---|
| Oil and filter change | Per manufacturer recommendations (depending on conditions) | Shorten interval under severe conditions |
| Oil level check | Regularly | Especially for engines with oil consumption issues |
| VVT solenoid cleaning/inspection | Per maintenance schedule | If accessible without major disassembly |
| Timing marks and chain condition check | Every service (listen for noise), detailed check per schedule | Immediate diagnostics if noises appear |
| Oil leak repair | Upon detection | Gaskets, seals, sensor seals, valve cover |
Common diagnostic mistakes to avoid
Incorrect diagnosis of P0011 can lead to unnecessary costs and repeated repairs. Below are common errors and correct alternatives.
Mistake 1: Replacing CMP/CKP sensors immediately without checking oil and solenoid
- Why it’s wrong: sensors rarely cause P0011; the code usually appears because of a valve timing mismatch, not sensor failure (unless accompanied by P0335/P0340 codes).
- Correct action: start diagnosis by checking oil level and quality, then the VVT solenoid, and only then the sensors.
Mistake 2: Ignoring oil pressure and clogged passages
- Why it’s wrong: low oil pressure (due to a worn pump, leaks, or clogged passages) is a main cause of P0011; replacing the solenoid or actuator won’t fix the problem if pressure is insufficient.
- Correct action: measure oil pressure with a mechanical gauge; if low, diagnose the pump, passages, and leaks.
Mistake 3: Underestimating timing chain and tensioner wear
- Why it’s wrong: a stretched chain shifts timing marks and causes valve timing advance; replacing the solenoid or oil won’t fix the issue if chain slack is significant.
- Correct action: check chain condition, timing marks, and tensioner at high mileage; replace the timing kit if worn.
Mistake 4: Skipping connector inspection and ECM power/ground check
- Why it’s wrong: an oxidized connector or poor ground causes unstable contact, solenoid malfunctions, and code triggers; solenoid replacement won’t help if wiring is faulty.
- Correct action: always inspect the solenoid connector and check wiring with a multimeter; restore contacts and grounds.
Related error codes and their connection to P0011
Codes related to the VVT system and CMP/CKP sensors often appear alongside P0011 or indicate different aspects of the same problem.
| DTC code | Description | Area/Relation to P0011 | Priority action |
|---|---|---|---|
| P0010 | Intake Camshaft Position Actuator Circuit (Bank 1) – VVT solenoid control circuit fault | Solenoid electrical circuit (open, short, connector oxidation) | Check wiring, solenoid connector, coil resistance; restore contact or replace solenoid |
| P0012 | Intake Camshaft Position ‘A’ Timing Over-Retarded (Bank 1) – excessive retard of intake camshaft | Opposite of P0011 (retard instead of advance); same causes (solenoid, oil, actuator) but timing shifted backward | Check oil, solenoid, VVT actuator; compare with P0011 (both codes may indicate an actuator stuck in an intermediate position) |
| P0021 | Intake Camshaft Position ‘A’ Timing Over-Advanced (Bank 2) – excessive advance on bank 2 | Similar to P0011 but for the opposite cylinder bank (V engines); same causes | Diagnose like P0011 but for the bank 2 solenoid/actuator |
| P0022 | Intake Camshaft Position ‘A’ Timing Over-Retarded (Bank 2) – excessive retard on bank 2 | Similar to P0012 but for bank 2 | Check bank 2 VVT solenoid/actuator |
| P0016 | Crankshaft Position – Camshaft Position Correlation (Bank 1 Sensor A) – CMP/CKP sensor mismatch | Timing mark misalignment, CMP/CKP sensor fault, chain stretch | Check timing marks, chain slack, CMP/CKP sensor signals |
Content is for educational purposes only and does not replace professional vehicle inspection. For faults, consult a qualified repair professional.
Frequently asked questions
Is it possible to drive with code P0011?
Briefly—not recommended. Driving with an active P0011 code is risky and can lead to serious engine damage. Why: – Wear of the timing chain and VVT solenoid can accelerate. – If timing marks shift, the chain can skip and valves may collide with pistons (in interference engines), causing bent valves, piston damage, and costly major repairs. – Loss of power, increased fuel consumption, and unstable engine operation reduce safety and comfort. Limited conditions: – If symptoms are mild (Check Engine light is on, but the engine runs steadily without knocking or stalling), it may be possible to drive a short distance (within reason, approximately to the nearest repair shop) for diagnostics. – If symptoms are severe (loud knocking under the hood, frequent stalling, oil pressure drop on the dashboard), stop driving and tow the vehicle. Recommendation: perform diagnostics as soon as possible; checking oil level and the VVT solenoid can often be done quickly.
How much does P0011 repair cost?
It depends on the root cause. The scope of work ranges from an inexpensive oil change to costly replacement of the timing chain kit or VVT solenoid. Factors affecting the final cost: – Vehicle model (parts availability, design complexity). – Region (labor rates, parts prices). – Scope of work (if both the timing chain kit and VVT solenoid need replacement, costs add up). Advice: starting with simple checks (oil, solenoid) helps avoid unnecessary expenses in many cases.
Will clearing the code with a scanner without fixing the cause help?
No. Clearing the code (clear DTC) removes the record from ECM memory and turns off the Check Engine light, but it does not eliminate the root cause. What happens when clearing without repair: – The P0011 code will return immediately or after several start-warm-up-drive cycles as soon as the ECM detects the timing deviation again. – Additional damage (wear of the timing chain, VVT solenoid) may occur due to continued operation with the fault. When clearing is appropriate: – After repair (oil change, VVT solenoid replacement, timing chain replacement, etc.)—clear the code, complete a drive cycle, and make sure the code does not return. – To check for an intermittent issue (rare cases when the code appeared due to a brief malfunction, for example, air entering the oil system after an oil change)—clear it, drive, and check for recurrence. Conclusion: clearing the code is a diagnostic procedure, not a method of fixing the fault. Without repair, the problem remains and may worsen.