Code P1800 is a manufacturer-specific DTC interpreted differently by various automakers. Most commonly, it relates to the intake system flap control circuit (VIAS, IMRC) or a valve hydraulic actuator. Below is a quick breakdown by brand, typical symptoms, causes, and step-by-step diagnostic and repair actions.
“P1800 is a code that often causes confusion. It is not universal: the same code number for Nissan refers to the intake geometry control solenoid, while for VAG it may indicate a hydraulic actuator of a completely different component. The first step is to verify the exact meaning for your make and model using the VIN, rather than searching for a universal fix online. Otherwise, you risk replacing incorrect parts and wasting time.” – Daniel Brooks, DecodeAuto
Page contents
What to do now (5 minutes)
If your check engine light just came on with code P1800, perform these steps for an initial assessment:
- Read the code and freeze frame data using any OBD-II scanner. Record engine RPM, load, coolant temperature (ECT), and vehicle speed at the time the fault was logged.
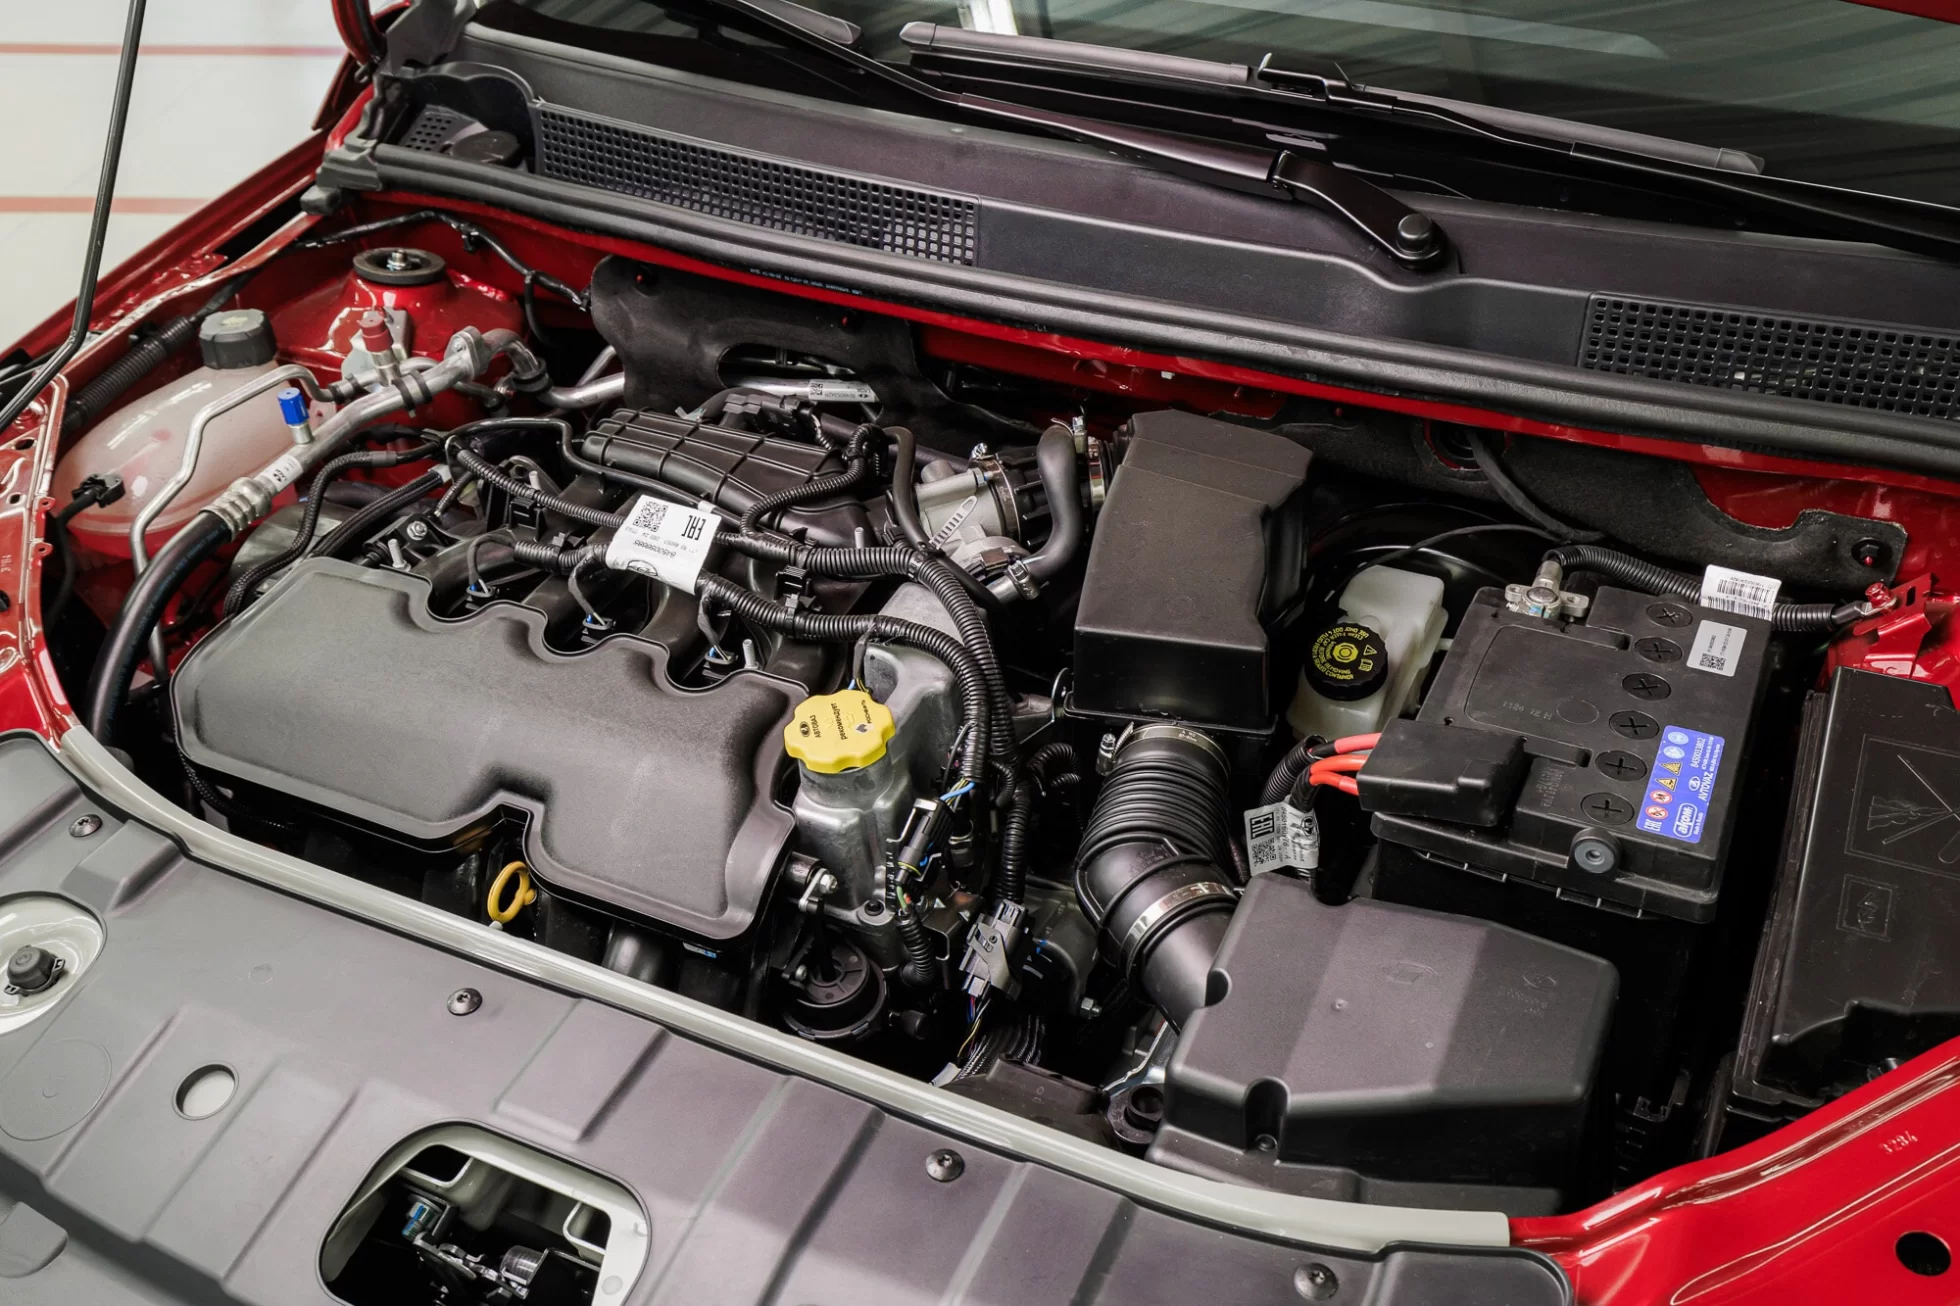
- Visually inspect the vacuum system: check all vacuum hoses to the intake system (VIAS/IMRC) for cracks, breaks, and loose clamps. Pay special attention to connections to solenoids—dried-out hoses often cause vacuum leaks.
- Measure fuel pressure at idle and during sudden throttle application. Connect a gauge to the fuel rail: normal pressure for return-type systems is 36–58 psi (2.5–4.0 bar), for returnless systems 51–80 psi (3.5–5.5 bar) (refer to your engine’s manual).
- Perform an actuator test of the solenoid via scanner (bi-directional test). The VIAS/IMRC solenoid should click when activated; coil resistance typically ranges from 20 to 40 ohms (check your manual).
- Manually check the actuator mechanism (engine off): try moving the flap actuator lever. If stuck, intake manifold disassembly will be required.
These steps will help narrow down the issue and determine whether urgent service is needed or if you can address the problem yourself.
What does code P1800 mean (DTC P1800)?
P1800 is a diagnostic trouble code recorded by the engine control module (ECM) when a fault is detected in one of the engine control circuits. This triggers the check engine light on the dashboard. The code’s meaning varies by manufacturer: it usually indicates a problem in the valve, flap, or intake system sensor circuit. The code is set after the ECM detects an electrical fault or functional deviation during self-testing.
How the ECM decides to set P1800 (trigger logic)
The ECM sets P1800 based on electrical and functional diagnostics of the target component. Typical enable criteria by brand are:
Nissan/Infiniti (VIAS): The ECM commands the solenoid at a certain RPM threshold (usually 4000–4500 rpm, depending on calibration) and load. After the command:
- an open circuit is detected (coil resistance >100 ohms or infinite),
- a short to ground (resistance <5 ohms),
- a short to power (control pin voltage remains at 12 V instead of dropping to 0 V),
- or no change in MAF/MAP readings within 2–3 seconds after flap activation (functional check),
the ECM logs P1800. The code becomes active if these conditions persist for two consecutive drive cycles.
GM (IMRC): similar logic—the ECM activates the solenoid/motor at high RPM. If no current is detected in the coil (open), excessive current (short), or the actuator fails to reach the target position within a set time (usually 3–5 seconds), the code is set. Thresholds and timings depend on the specific engine.
VAG (N331): depending on the system (intake or transmission), the ECM/TCM monitors PWM signal delivery to the valve and hydraulic circuit pressure. If the valve does not reach the commanded position (checked via position sensor or indirect pressure parameters), or coil current is out of range, the code is set. For intake systems, changes in airflow (MAF) during flap activation are also analyzed.
Summary: P1800 is set when the ECM does not observe the expected electrical or functional response from the component after a control command. This may be due to wiring issues (open/short), mechanical actuator seizure, or vacuum circuit leaks.
It is important to understand that P1800 is a manufacturer-specific code in the P1xxx range (per SAE J2012 standard). This means each manufacturer assigns it to different components and systems. The only way to know exactly what the ECM monitors in your vehicle is to consult service documentation or a VIN-based database with calibration details.
“The P1xxx range is reserved by SAE J2012 for manufacturer-controlled codes—meaning each manufacturer can assign P1800 to any component within their calibrations. There is no universal interpretation. Always verify by VIN or engine code in official documentation (ELSA/ErWin for VAG, GM Service Information, Nissan FAST).” – SAE J2012:2016, section 5.6.2 “P1XXX Manufacturer Control”
Recommended sources for verification:
- Nissan/Infiniti: service manuals for VIAS (Variable Induction Air System)
- VAG (Audi/VW/Skoda/SEAT): technical documentation TPI/ELSA for component N331
- GM (Chevrolet/Cadillac): GM Service Information for IMRC (Intake Manifold Runner Control)
- SAE J2012:2016 (DTC code standard): P1xxx range reserved for manufacturer control – SAE.org
How to check the code meaning by VIN
To find the exact meaning of P1800 for your vehicle:
- Enter the VIN into a dealer or professional database (ELSA/ErWin for VAG, GM Service Information, Nissan FAST, Infiniti service portals).
- Locate the DTC diagnostics section and code P1800—there you will find component descriptions, connector pins, wiring diagrams, and nominal values (coil resistance, supply voltage, test procedures).
- Download the latest TPI/TSB (Technical Product Information / Technical Service Bulletin) for your model—these often contain updated diagnostic procedures and known issues.
Example for VAG: enter VIN in ELSA → “Electrical equipment” section → find N331 → view description (intake or transmission) and pinout. For EA888 Gen3 engines, P1800 may indicate the intake flap control valve; for certain transmissions, it may refer to a hydraulic actuator.
Example for Nissan: enter VIN in Nissan FAST → “DTC P1800” → get the specific decoding for your engine (VQ35DE, VQ40DE, VK56DE, etc.) and model year.
Without VIN verification, you risk diagnosing the wrong component.
Quick P1800 decoding by brand
Nissan/Infiniti: most often the code indicates a fault in the electromagnetic solenoid controlling the intake geometry system VIAS (VIAS Control Solenoid Valve). Found on VQ engines (VQ35DE, VQ40DE) in Maxima, Altima, Murano, 350Z/370Z, Pathfinder, Frontier, and VK engines (VK56DE) in Titan/Armada. Less commonly, on some platforms, it may indicate a fault in the clutch sensor or gear lever position sensor circuit (older models with manual transmissions).
VAG (Audi/VW/Skoda/SEAT): the code may indicate a fault in the hydraulic actuator or valve N331. Important: N331 is used in different systems depending on model and year:
- Transmission: electromagnetic valve of a hydraulic actuator in the transmission (for example, Audi allroad quattro with automatic transmission).
- Intake: on certain engines (check engine code in ELSA) – intake manifold flap control valve.
The exact meaning depends on engine code (e.g., EA888 Gen2/3, CAWA, CZCA) and model year. Without VIN/TPI verification, misdiagnosis is possible. For example, on VW Tiguan 2.0 TSI (EA888 Gen3, 2016+), P1800 may mean the N331 valve in the intake, while on Audi A6 allroad (2005–2010) with automatic transmission, it refers to a transmission valve.
GM (Chevrolet/Cadillac): usually related to the IMRC solenoid or intake manifold flap actuator on various engines (e.g., 3.6 LLT in Cadillac CTS/SRX, 5.3 Vortec in Chevrolet Silverado/Tahoe). Variations may involve the transmission control module (TCM) on older platforms—consult ECM/TCM calibration and GM Service Information.
| Brand/platform | Component/circuit | Typical engines/models | Symptoms | Quick checks | Notes |
|---|---|---|---|---|---|
| Nissan/Infiniti | VIAS control solenoid valve (intake control solenoid) | VQ35DE (Maxima, Altima, Murano, 350Z), VQ40DE (Frontier, Pathfinder), VK56DE (Titan, Armada) | Loss of power above 4000 rpm, rough idle, hesitation on acceleration | Check vacuum hoses, solenoid test via scanner (bi-directional), measure coil resistance (typically 20–40 ohms, verify in manual), visually check actuator operation | Related codes: P2004–P2008 (IMRC stuck), P1136/P1138 (O2 sensor), P0171/P0172 (lean/rich) |
| VAG (Audi/VW) | Hydraulic actuator/valve N331 (transmission or intake, depending on model) | EA888 Gen2/3 (Tiguan, Golf, Passat 2.0 TSI), CAWA/CZCA (Octavia, Karoq), some automatic transmissions (Audi allroad quattro) | Intake: power loss, rough idle. Transmission: harsh shifting, downshift concerns | Check PWM signal with oscilloscope, hydraulic circuit pressure (if transmission), valve position where applicable | Requires VIN and TPI/ELSA verification. Intake: check MAF/MAP during flap activation. Transmission: check pressures in applicable circuits |
| GM (Chevrolet/Cadillac) | IMRC solenoid/actuator (intake manifold flaps) | 3.6 LLT (CTS, SRX), 5.3 Vortec (Silverado, Tahoe), 6.2 LS (Corvette, Camaro) | Lack of power at high RPM (>3000 rpm), hesitation on acceleration, increased fuel consumption | Activate via scanner (bi-directional test), visually/manually check flap movement, inspect vacuum lines for leaks, measure coil resistance (check GM SI) | Related codes: P2004 (IMRC stuck open), P2006 (IMRC stuck closed), P0171/P0174 (lean Bank 1/2) |
Expert note: P1800 is a manufacturer-specific DTC. Always verify the exact meaning by VIN and ECM/TCM calibration code. Diagnosing by analogy with another brand often leads to replacing incorrect parts. For VAG, VIN/TPI verification is mandatory since N331 is used in different systems.
How VIAS/IMRC works in simple terms
Intake geometry control systems (VIAS for Nissan, IMRC for GM/Ford) optimize air delivery depending on engine speed. The principle:
At low and medium RPM (up to 3000–4500 rpm): the valve/flap is closed. Air flows through the long intake manifold runner. This creates low-frequency resonance, increasing airflow velocity and improving cylinder filling at low RPM—boosting torque in the 1500–3500 rpm range.
At high RPM (above the activation threshold, usually 4000–4500 rpm): the ECM signals the VIAS/IMRC solenoid. The solenoid opens the vacuum line to the actuator (Nissan) or activates an electric motor (GM/Ford). The actuator opens the flaps/valves, and air flows through a shorter path. This reduces flow resistance at high RPM and increases engine power.
Example on Nissan VQ35DE: Below 4500 rpm, the power valve is fully closed. This increases mid-range torque. At 4500 rpm, the ECM signals the VIAS solenoid, vacuum reaches the actuator, the power valve opens—two intake branches merge, the path shortens, resistance drops, and power rises at high RPM.
What happens when faulty: If the solenoid is stuck or the actuator loses vacuum, the flaps do not open on time. The engine may feel restricted at high RPM, causing hesitation on acceleration. The ECM may set P1800 because it does not see the expected airflow change (MAF/MAP) after the open command.
Symptoms and signs accompanying P1800
Main symptoms with active P1800: check engine light on, unstable engine operation, power loss, increased fuel consumption, possible starting issues. Some drivers report hesitation on acceleration and sluggishness at high RPM. Symptom severity depends on whether the fault is electrical or mechanical.
Typical signs:
- Check engine light illuminated steadily (not flashing) with P1800
- Power loss, especially hesitation above 4000 rpm (typical for Nissan VIAS/GM IMRC)
- Rough idle (RPM fluctuates between 600–1000) if related to a vacuum leak or oxygen sensor fault
- Increased fuel consumption, sometimes fuel smell in the exhaust due to a rich mixture from incorrect ECM corrections
- Starting difficulties hot or cold—rare, usually with accompanying codes P0171/P0172 (lean/rich)
- Jerks during transient conditions (load changes, e.g., overtaking or hill climbing)
- Changes in intake sound (whistling, hissing from air leaks in vacuum hoses)
- Cruise control failure or malfunction on some platforms (if P1800 relates to clutch switch/cruise control switch on older Nissan/Ford)
Important: If P1800 appears with a flashing check engine light or knocking, stop driving immediately. A flashing light indicates misfires that can melt the catalytic converter and damage the engine.
Main causes of P1800
P1800 causes vary by vehicle brand. Most often it is a solenoid or intake system mechanism fault, wiring and connector issues. It can also be triggered by sensor failures, vacuum leaks, incorrect fuel pressure, or ECM software issues.
Faulty regulator or incorrect fuel pressure
Unstable fuel pressure can indirectly contribute to P1800, especially on engines with load-based flap control. The ECM calculates flap opening timing based on mass airflow (MAF) and load. If fuel pressure is too low (worn pump, clogged filter) or too high (stuck regulator), the mixture becomes lean or rich. The ECM adjusts fuel via STFT/LTFT (short- and long-term fuel trims), but flap control algorithms may behave erratically due to shifted load parameters.
How to check:
Connect a gauge to the fuel rail. Measure pressure at idle and under load (sudden throttle). Compare to your engine’s specs:
- Gasoline engines with return line: typically 36–58 psi (2.5–4.0 bar).
- Returnless systems: typically 51–80 psi (3.5–5.5 bar).
Note: these ranges are approximate. Check exact specs in the service manual by VIN.
If pressure is low, check pump (current draw, flow rate), the fuel filter, and fuel lines for kinks or pinches. High pressure indicates a stuck fuel pressure regulator (if external type, inspect the vacuum line: a broken vacuum hose can cause pressure to rise).
What to do:
If abnormal, diagnose the fuel pump, replace the fuel filter, and if needed, replace the regulator or pump module per manufacturer specs. After repair, reset fuel trim adaptations (STFT/LTFT) with a scanner.
Vacuum leaks in intake system
Air leaks in the intake tract are a common cause of P1800 on vacuum-controlled flap systems (e.g., Nissan VIAS). Vacuum leaks lean out the mixture, causing the ECM to increase fuel trims (STFT/LTFT positive). Flap actuator control algorithms can become unstable because actual airflow (MAF) does not match calculated airflow (MAP + throttle position).
Where to look for leaks:
Inspect the intake manifold and all vacuum hoses for cracks, breaks, and loose clamps. Check throttle body and intake manifold gaskets (especially on engines with plastic manifolds prone to microcracks after high mileage or heat exposure). Pay attention to hose connections to VIAS/IMRC solenoids—hoses often dry out and lose sealing ability (visible as cracks near clamps or wear from engine vibration).
Effective diagnostics:
Pressure testing or smoke testing is the most reliable method. Connect a smoke machine output to the intake manifold via hose (after the air filter or at the MAF sensor inlet). Apply 1–2 psi (0.07–0.14 bar) pressure and watch for smoke escaping at joints. Simultaneously monitor short-term fuel trims (STFT) at idle via scanner: values above +10% may indicate a leak (threshold depends on ECM calibration—check the service manual).
Alternative method without a smoke machine: spray carb cleaner around intake manifold joints with the engine idling. If RPM rises near a suspected leak, the leak is confirmed.
What to do:
Fix leaks by replacing damaged hoses/gaskets and properly seating connections. After repair, reset fuel trim adaptations (STFT/LTFT) with a scanner and verify stable values at idle and under load.
Oxygen sensor (lambda) malfunction
A faulty oxygen sensor sends incorrect mixture data to the ECM. The ECM adjusts fuel injection assuming the mixture is lean or rich when it is not (or fails to adjust when needed). Flap actuator control algorithms may become unstable because load calculation partly depends on front O2 sensor readings.
How to check:
Use a scanner with live data support. Monitor the front (pre-cat) oxygen sensor signal at idle:
- A healthy zirconia sensor fluctuates between 0.1–0.9 V at about one switch per second or more (rich/lean mixture).
- A faulty (“lazy”) sensor may hold a steady 0.2–0.7 V without fluctuations or respond slowly.
Also check the sensor heater circuit:
- Heater resistance is often in the 2–14 ohm range, but verify the spec in the service manual.
- Heater supply voltage with engine running should typically be battery voltage.
What to do:
If confirmed faulty, replace with a quality OEM or trusted aftermarket sensor (e.g., Denso, Bosch, NTK). Clean connector contacts with contact cleaner and apply dielectric grease to seals if appropriate. Reset fuel trim adaptations (STFT/LTFT) after replacement to avoid running on old compensations.
ECM or wiring issues
The ECM sets P1800 when it detects electrical faults in the control circuit (VIAS solenoid, IMRC actuator, N331 valve). This may be a broken wire, short to ground or power, connector corrosion, or wiring harness damage (chafing on the body, rodent damage, heat near the exhaust manifold).
How to check:
Start with a visual inspection of wiring from the component to the ECM. Look for insulation wear at body contact points (especially near the steering rack and exhaust manifold), signs of overheating (melted connectors, burnt wires), and green corrosion on connector pins (moisture ingress).
Perform multimeter diagnostics:
- Check power at the solenoid/actuator pin: should be 12 V with the ignition on or when commanded by the ECM (measure between the power pin and chassis ground).
- Check ground: resistance between the component ground pin and engine ground (bolt on cylinder head/block, battery negative terminal) should be <0.5 ohms (continuity test). Higher resistance indicates a poor ground.
- Check control signal: during scanner activation (bi-directional test, “Actuator Test”), voltage on the control pin should change. For a VIAS solenoid: idle voltage 12 V, drops to 0 V when activated (ECM grounds the circuit). For PWM valves (N331 on VAG), check the PWM signal with an oscilloscope (frequency, duty cycle).
- Check wiring continuity from component to ECM: disconnect component and ECM connectors, measure resistance between corresponding pins—should be <1 ohm. Infinite resistance indicates a break.
What to do:
If a break is found, repair wiring with proper automotive wiring repair methods. For connector corrosion, clean pins with contact cleaner (e.g., CRC Electrical Contact Cleaner) and replace the connector if needed (repair kits are available for most models). If wiring is intact but the code persists, check for ECM firmware updates and calibration integrity. Sometimes reflashing or an adaptation procedure per TSB helps. Consult a dealer or qualified repair shop.
Faulty solenoid/actuator of intake system (VIAS/IMRC/N331)
The solenoid or actuator controlling intake geometry flaps is the most common cause of P1800 on Nissan/Infiniti (VIAS) and GM (IMRC). The solenoid controls vacuum supply to the actuator (Nissan) or directly moves flaps via electric motor (GM/Ford). If the solenoid sticks, the coil burns out, or the actuator leaks vacuum, the ECM sets the code.
Fault symptoms:
- No geometry/flap switching (flaps do not open above threshold RPM, usually 4000–4500 rpm—check calibration)
- Power loss at high RPM
- Related codes P2004–P2008 (IMRC stuck open/closed, intake manifold flaps stuck)
Checks:
- Measure solenoid coil resistance with a multimeter: typically 20–40 ohms depending on model (reference; verify nominal in the service manual). Infinite (open coil) or <5 ohms (short) indicates a faulty solenoid.
- Activate the solenoid via scanner (bi-directional test, “Actuator Test” or “VIAS Control Solenoid Valve”): control pin voltage should drop to 0 V (ECM grounds the circuit), and the solenoid should click audibly. Silence indicates a faulty solenoid or no power/ground.
- Check vacuum to the actuator (for vacuum-controlled systems like Nissan VIAS): disconnect the vacuum hose from the actuator, connect a hand vacuum pump, and apply 15–24 inHg (400–600 mmHg) of vacuum. A good actuator holds vacuum (pump gauge does not drop for at least 30 seconds), and the rod moves visibly or manually (push/pull actuator lever).
- Check mechanical movement of rods/flaps: with the engine off, try moving the actuator lever manually (on Nissan, lever on the intake manifold linked to flaps). If flaps are stuck or stiff, intake manifold disassembly is needed for cleaning or flap replacement.
Repair:
- Nissan VIAS: replace the solenoid and check/replace the actuator if needed. Actuator assembly with manifold can be expensive, and unofficial diaphragm repairs are sometimes discussed online, but full assembly replacement is the safest recommendation.
- GM IMRC: replace the solenoid/electric motor actuator. If flaps are stuck, disassemble the intake manifold, clean carbon deposits, and inspect rods/shafts.
- VAG N331 (intake): replace the N331 valve. For transmission valves, check the hydraulic circuit and pressures (diagnostics at a dealer or VAG specialist with VCDS/ODIS).
After repair, verify system operation on the road: flaps should open above threshold RPM (usually 4000–4500 rpm—check the service manual). Drive in various modes (idle, acceleration to 5000+ rpm, highway) and ensure P1800 does not return.
Step-by-step P1800 fault diagnosis
Important: safety precautions
Before starting work, observe the following:
- Fuel system work: relieve fuel rail pressure (remove pump fuse, run engine until it stalls). Avoid sparks and open flames near fuel components. Work in a well-ventilated area and follow applicable local safety regulations.
- Automotive electrical work: disconnect the battery negative terminal before disconnecting/connecting ECM or component connectors. Use insulated tools and follow applicable local electrical safety standards.
If you lack experience or special tools (bi-directional scanner, smoke machine, fuel pressure gauge, vacuum pump, multimeter), seek professional service.
Diagnosing P1800 involves sequential steps from simple to complex. The goal is to rule out obvious causes before deeper electrical and mechanical checks.
Step 1: Connect scanner and read codes
Connect an OBD-II scanner, read codes and freeze frame data. Freeze frame shows conditions when the ECM logged the code:
- Engine RPM: e.g., 4200 rpm—indicates code occurred during flap activation attempt.
- Engine load (%): e.g., 60%—typical acceleration load.
- Coolant temperature: e.g., 185°F (85°C)—engine warmed up.
- Vehicle speed: e.g., 50 mph (80 km/h)—highway driving.
- Mass airflow (MAF, g/s) or intake pressure (MAP, kPa): helps assess deviation at fault time.
Freeze frame example and analysis:
Freeze frame for P1800:
RPM: 4200 rpm
Load: 60%
ECT: 185°F (85°C)
MAF: 18 g/s
MAP: 45 kPa
Vehicle Speed: 50 mph (80 km/h)
STFT Bank 1: +8% (possible small vacuum leak)
Interpretation: Code set during a VIAS/IMRC flap opening attempt at high RPM (4200) under medium load. MAF/MAP look reasonable, but STFT +8% may hint at a slight air leak. Likely causes: vacuum leak in the actuator line or a faulty solenoid (no vacuum supply).
Clear codes and test drive. If P1800 returns immediately (after 1–2 drive cycles), it is an active fault. If not, it may be an intermittent fault caused by temporary poor connector contact or condensation.
Step 2: Visual inspection
Inspect connectors of the target unit (VIAS/IMRC solenoid, N331 valve, sensor). Check the wiring harness for abrasion (especially where it contacts the body), overheating signs (melted connectors), and corrosion on pins (green oxidation). Clean corrosion with contact cleaner (e.g., CRC Electrical Contact Cleaner), tighten connector locks. Check engine grounds: resistance between battery negative and engine block should be <0.5 ohms (continuity test).
Step 3: Fuel pressure check
Connect gauge to the fuel rail (if equipped with a service port). Measure pressure at idle and under load (sudden throttle). If out of range (see “Faulty regulator or incorrect fuel pressure” section), address the filter/pump/regulator.
Step 4: Vacuum leak search
Use a smoke machine or spray carb cleaner around intake manifold joints, hoses, and throttle body gaskets. Spray near a leak can cause RPM to rise. Monitor STFT at idle: values above +10% may confirm a leak (threshold depends on calibration).
Step 5: Oxygen sensor check
Monitor pre-cat O2 sensor response at idle and during sudden throttle changes (live data). Check heater operation (resistance and supply voltage per spec). Compare bank 1 and bank 2 readings (for V engines): a significant difference at idle may indicate a sensor fault. Replace if needed.
Step 6: Electrical tests
Check wiring continuity from component to ECM:
- Power supply (12 V with ignition on).
- Ground (<0.5 ohms between component ground pin and engine ground).
- Control signal: voltage changes during scanner activation (bi-directional test).
- Solenoid coil resistance (typically 20–40 ohms; verify in the service manual).
Repair wiring using proper automotive wiring repair methods if an open or short is found.
Step 7: Actuator test
Force solenoid/valve activation via scanner (bi-directional test, “Actuator Test”). Solenoid should click, and control pin voltage should change (measure DC voltage between pin and ground). Engine RPM may change slightly. For vacuum systems, apply 15–24 inHg (400–600 mmHg) of vacuum to the actuator with a hand pump; the actuator must hold vacuum and the rod must move.
Step 8: ECM check (if needed)
If all components and wiring are good but the code persists, check for ECM firmware updates (dealer or qualified repair shop), reset adaptations (fuel trims, idle), and verify calibration integrity. Check ECM power and grounds (main connector voltage stable at 12–14 V with engine running).
Diagnosis completion:
Perform a test drive with data logging. Drive in various modes (idle, acceleration to 5000+ rpm, highway, city) and ensure P1800 does not return and flap control activates above threshold RPM (usually 4000–4500 rpm).
How to fix P1800 and clear check engine
Fixing P1800 involves repairing the root cause. Replace the faulty solenoid/valve, repair wiring, restore grounds, fix vacuum leaks, normalize fuel pressure (replace regulator, pump, filter), and replace the oxygen sensor if needed.
Post-repair procedure:
- Clear the code via scanner. Select “Clear Codes” or “Erase Codes.” Also reset adaptations if supported: short- and long-term fuel trims (STFT/LTFT), idle adaptations, transmission adaptive parameters (if automatic).
- If no scanner is available, disconnect the battery negative terminal for 5–10 minutes. Note: this resets the radio, clock, memory seats (if any), and transmission adaptations. After reconnecting, reinitialize power windows if required, and perform transmission relearn as applicable.
- Perform a control drive: about 9–12 miles (15–20 km) in various modes (idle, acceleration, highway at 50–62 mph (80–100 km/h), city with stops). Ensure the check engine light does not return and the engine runs smoothly with no hesitation on acceleration. Verify VIAS/IMRC activation at high RPM (acceleration to 5000+ rpm).
- Re-scan for codes. If P1800 does not return and no new codes appear, the repair was successful. If it returns, revisit diagnostics (possibly a second cause was missed or the repair was incomplete, e.g., solenoid replaced but vacuum leak remains).
This information is general and does not replace professional consultation. Fuel system and electrical work require safety precautions (see “Safety precautions” above). If inexperienced or lacking tools, seek professional service.
Repair cost and DIY feasibility
Repair cost for P1800 depends on the cause and vehicle brand. Below are approximate parts and labor prices for the US market.
Approximate parts prices:
- VIAS/IMRC solenoid: $40–150 (OEM), $25–80 (aftermarket). Example: Nissan VIAS solenoid OEM ~$100–120, Dorman aftermarket ~$50–70.
- Vacuum hoses/intake manifold gaskets: $5–40. Example: vacuum hose kit for Nissan VQ ~$15–25, intake manifold gasket ~$20–35.
- Oxygen sensor: $40–180 (OEM), $25–100 (aftermarket). Example: Denso O2 sensor for VQ35DE ~$80–120, universal Bosch ~$40–60.
- Fuel pressure regulator/pump module: $60–300 (varies by vehicle). Example: Nissan regulator ~$60–100, pump module assembly ~$200–300.
- Connectors/wiring: $10–50 (repair kits, wires, heat shrink).
| Job/Part | Part price (approx., USD) | Labor time (hours) | Difficulty | Total cost (USD) |
|---|---|---|---|---|
| VIAS/IMRC solenoid replacement | $40–150 | 0.5–1.0 | Medium | $115–300 |
| Vacuum leak repair (hoses/gaskets) | $5–40 | 0.7–1.5 | Low–Medium | $110–265 |
| Oxygen sensor replacement | $40–180 | 0.5–1.0 | Low | $115–330 |
| Fuel pressure regulator replacement | $60–300 | 1.0–2.5 | High | $210–675 |
| Wiring/connector repair | $10–50 | 0.5–1.5 | Medium | $85–275 |
Note: prices are approximate for the US market and vary by region, vehicle model, and parts brand. Adjust labor costs to your local market conditions and verify costs by VIN and ECM calibration with local suppliers and repair shops.
When DIY is feasible:
- Replacing vacuum hoses, cleaning connectors—requires minimal tools (screwdrivers, pliers, contact cleaner).
- Replacing the VIAS/IMRC solenoid if easily accessible (no intake manifold removal). For example, the Nissan VQ solenoid is on top of the manifold and can be replaced in 15–30 minutes.
- Oxygen sensor replacement—requires an oxygen sensor socket (7/8 in. / 22 mm with wire slot) or adjustable wrench. The sensor is usually located on the exhaust manifold and may be accessible from below or above.
- Fuel pressure check—requires a gauge with the proper fuel rail adapter.
When to seek professional service:
- No special tools (bi-directional scanner, smoke machine, vacuum pump, fuel pressure gauge, oscilloscope for PWM signals).
- No access to wiring diagrams for your model (ELSA/ErWin for VAG, GM SI, Nissan FAST).
- Multiple fault codes present (P1800 + P0171/P0172 + P2004–P2008)—requires comprehensive diagnostics.
- Unstable electrical parameters (voltage spikes, signal loss)—possible ECM fault or poor grounds/power supply.
- Intake manifold disassembly needed for component access (e.g., VIAS actuator replacement on some Nissan applications requires manifold removal and new gaskets).
Disclaimer: prices are approximate and vary by region, vehicle, and parts brand. Verify costs by VIN and ECM calibration with local suppliers and repair shops.
Related codes and what to check simultaneously
P1800 rarely appears alone. The ECM often logs related codes that help pinpoint the fault.
Codes related to intake/IMRC/VIAS:
- P2004–P2008: IMRC stuck open/closed (intake manifold flaps stuck open or closed). Check flap actuator mechanism (manifold disassembly, carbon cleaning), vacuum lines (leaks), solenoid (coil open, valve stuck). Source: GM Service Information, Ford service information.
- P1136/P1138: manufacturer-specific codes on some Nissan/Infiniti platforms related to intake or fuel control. Check the service manual for the exact application.
Mixture/O2 sensor codes:
- P0171/P0172: lean/rich mixture (bank 1). Check vacuum leaks (smoke test), fuel pressure (gauge), oxygen sensor (live data, oscilloscope), MAF sensor (clean or replace).
- P0130–P0167: oxygen sensor codes (bank 1/bank 2). Check O2 sensor signals (live data), heater circuit, and wiring (open/short).
EVAP/vacuum codes:
- P0441–P0455: EVAP system leaks. Check fuel cap seal, purge valve (solenoid, activate via scanner), EVAP vacuum lines (smoke test), charcoal canister.
Electrical codes:
- P0650: malfunction in check engine indicator circuit (MIL). Check dashboard lamp, wiring from the ECM to the cluster (open/short).
- P060x: ECM internal memory/calibration faults (e.g., P0601 – Internal Control Module Memory Check Sum Error). Requires ECM inspection, possible reflashing or replacement.
- Cross-circuit faults: e.g., shorts between control wires of different solenoids (can show up as multiple simultaneous codes for EVAP, VVT, and VIAS solenoids).
Recommended diagnostic sequence for multiple codes:
- Power and grounds (check battery connections, engine grounds, ECM main connector voltage 12–14 V).
- Vacuum (smoke test/spray leak detection, STFT >+10%).
- Fuel pressure (gauge measurement: 36–58 psi (2.5–4.0 bar) for return-type, 51–80 psi (3.5–5.5 bar) for returnless; verify the service manual).
- Electrical and signals (wiring continuity, sensor live data/oscilloscope).
- Actuator mechanics (check VIAS/IMRC flap movement, rods, vacuum retention with a pump).
Content is for educational purposes only and does not replace professional vehicle inspection or repair instructions. If inexperienced or lacking tools, consult a qualified repair facility.
Frequently asked questions
Is it possible to drive with the P1800 code on?
Temporarily, yes, if there is no obvious loss of power, knocking, or a flashing Check Engine light. However, repairs should not be delayed. Possible consequences include worse fuel economy due to suboptimal intake system operation, catalytic converter damage if the code is related to an oxygen sensor fault or rich mixture, and progressive wear of related components if the VIAS/IMRC system is not operating correctly. If the Check Engine light is flashing, stop immediately and call a tow truck. Flashing indicates misfires, which can melt the catalytic converter and damage the engine.
Is P1800 on Nissan always VIAS?
No, not always. P1800 on Nissan/Infiniti most often indicates a fault in the VIAS solenoid circuit (Variable Intake Air System Control Solenoid Valve), especially on VQ (VQ35DE, VQ40DE) and VK (VK56DE) engines. However, on some older models, P1800 may indicate a fault in the clutch interlock switch or the gear lever position sensor. How to know for sure: check the decoding by VIN in Nissan FAST or the service manual for your model and year. A scanner supporting Nissan-specific codes will show the full description (for example, "VIAS Control Solenoid Valve Circuit" or "Clutch Interlock Switch Circuit").
Is P1800 on VAG always N331?
Usually, on VAG (Audi/VW/Skoda/SEAT) P1800 is interpreted as a fault related to solenoid valve N331. But an important nuance: N331 is used in different systems depending on the model and year. It may refer to a transmission-related solenoid valve on some applications, while on others it may be an intake manifold flap control valve. Without checking by VIN/ELSA/TPI, it is impossible to determine which system N331 refers to in your specific vehicle. Recommendation: enter the VIN in ELSA/ErWin → "Electrical Equipment" section → find N331 → see the system description and connector pinout.
Is P1800 on GM always IMRC?
Usually yes, but not always. On GM (Chevrolet/Cadillac), P1800 most often relates to the IMRC (Intake Manifold Runner Control) circuit—the solenoid or actuator of the intake manifold flaps. However, on some platforms, P1800 may indicate a fault in the transmission control module (TCM) or the automatic transmission selector position sensor. How to check: open GM Service Information (SI) for your model and year → "Diagnostic Trouble Codes" section → P1800 → see the description. Alternatively, a scanner supporting GM-specific codes will show the full name.
Will disconnecting the battery terminal help?
It will temporarily turn off the Check Engine light but will not eliminate the root cause. The code will return after the ECM detects the fault again, depending on the vehicle and fault conditions. Battery disconnection is recommended only after repairs to clear adaptive values (STFT/LTFT, idle parameters, transmission adaptations). Note the side effects: disconnecting the battery will reset radio settings, clock, memory seats (if any), and adaptive transmission parameters. The correct approach is: fix the cause → clear the code with a scanner (or battery terminal) → perform a test drive → ensure the code does not return.